Wire Chat: talking to Claude Code from a Game Boy
I spend a lot of my day with Claude Code sessions running on my Linux machine. Most of the time they don’t need me. They need me for about four seconds at a time: “can I run the tests?”, “can I push this?”, “which of these two do you want?”. And every time, I walk back to the desk, find the right terminal, press a key, and walk away again.
So I built a way to answer those four-second questions from the couch. On a Game Boy Advance.
Wire Chat is a small handheld client for my real Claude Code sessions. It lists my projects and sessions, shows Claude’s replies as they stream in, lets me type back on a little predictive keyboard, and puts every permission prompt on the handheld’s screen, where A means yes and B means no. The Game Boy Advance version talks through its link cable to an ESP32 board, the ESP32 talks Wi-Fi to a small relay on my PC, and the relay runs the official claude command with the login I already have. There is no API key anywhere in the chain.
Yes, it’s silly. It’s also a genuinely nice way to keep an eye on long-running agent work, and building it taught me more about link cables, level shifters and ESP32 pin quirks than I ever meant to learn. This post covers what it does, how it fits together, and how to wire and set up your own.
Where things stand (November 2026)
- Game Boy Advance: running on my real GBA with an ESP32-C3 bridge and the relay on my PC. Wire Chat 1.1 is on the cartridge and the bridge is paired with the relay.
- Game Boy Color: working on my real GBC through an ESP32-S3 bridge and a level shifter. The video below shows a real session on it: Claude’s reply, typing on the keyboard, sending, and the next reply arriving.
- 3DS: working on my real 3DS. It goes straight to the relay over the 3DS’s own Wi-Fi, with no bridge; I paired it with the relay and used it in a real Claude Code session.
- PS Vita: working on my real PS Vita, including a real session in AUTO mode with approvals answered on the Vita. Like the 3DS it goes straight to the relay over its own Wi-Fi, with no bridge.
Pictures marked “App screen (demo data)” are renders of the app with demo data. Pictures marked “Photo” are my real hardware, with addresses, codes, paths and figures blurred.
What it does
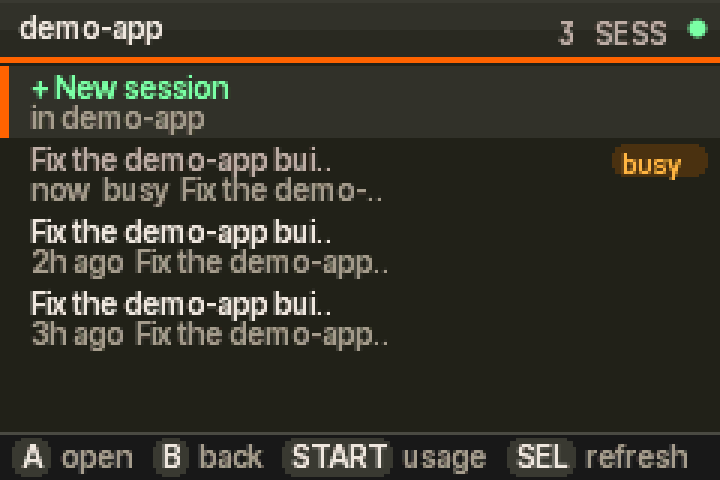 App screen (demo data): a project’s sessions on the GBA. “busy” means it is open in a terminal right now.
Projects and sessions. Wire Chat reads the projects and sessions Claude Code already keeps on my PC and shows them as a list: project first, then its sessions with a short preview, plus “+ New session”. A session that is open in a terminal at that moment is marked busy and opens read only, so the same session is never resumed twice from two places. That was the first thing I saw when I paired it for real, and it’s exactly the behaviour I wanted.
Streaming replies. Claude’s text arrives as it is written. Tool calls show as one-line summaries (Bash: git status, Edit: src/main.c), so you can follow what it’s doing without a wall of output on a 240 x 160 screen.
Approvals on the handheld. Every permission prompt comes to the console: “Allow Bash: git push origin main?” A allows it once, B denies it. The relay never says yes on its own: no answer, a closed session or any error counts as no, and an approval nobody answers for 30 minutes is denied with a note.
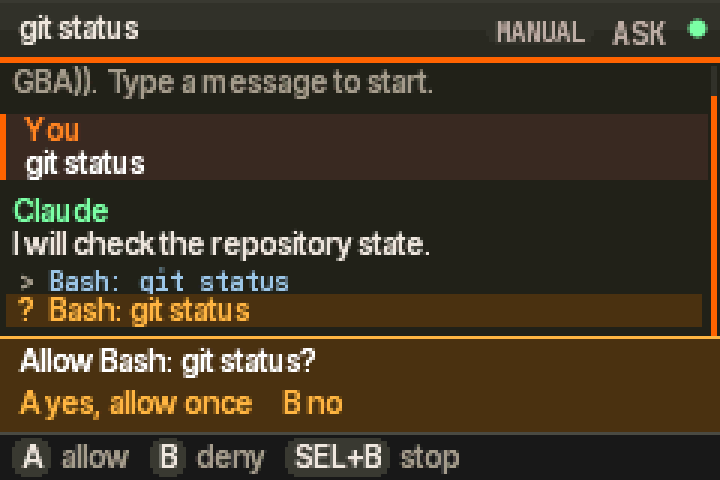 App screen (demo data): an approval prompt. A allows once, B denies.
A keyboard that’s actually usable. The first time I typed on the real GBA I immediately wanted numbers, symbols and some help with the typing, so version 1.1 has a number row on every page, every programming symbol I could think of, and a suggestion bar. It completes the word you’re typing and suggests the next word after a space. Words come from a 4,000-word English list, developer words (git, commit, branch, deploy and friends), your project names, and words it learns from the conversation itself. R takes the top suggestion. There’s also a row of quick prompts: continue, yes, no, explain, run the tests, git status, summarize, go ahead.
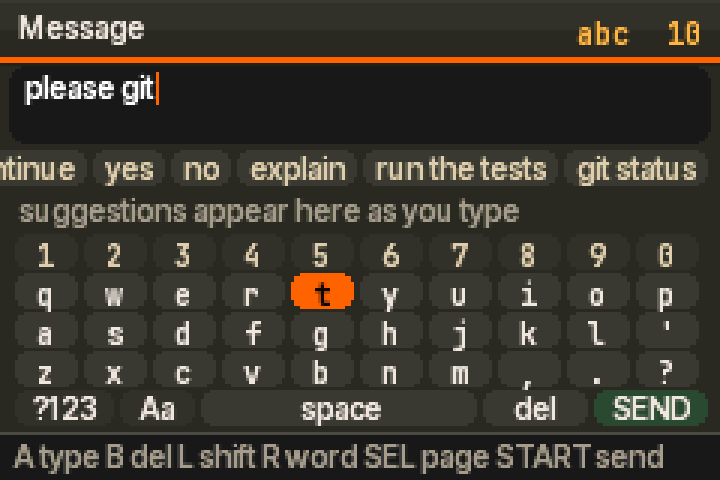 App screen (demo data): the keyboard, with quick prompts above the keys.
Permission modes. Each session can run in MANUAL (Claude Code’s default: ask first), ACCEPT EDITS, PLAN (read only) or AUTO, where Claude Code’s own classifier runs what it judges safe and still asks about the risky things, which still come to the handheld. You switch from the session menu (SELECT) and the mode shows in the header. The fully unattended modes are never offered.
Sessions that keep running. Pressing B leaves a conversation, but the session doesn’t stop. The relay keeps the claude process running, mid-reply if need be, and keeps everything it prints. The session list shows running sessions first, flagged RUN, or ASK ? when an approval is waiting. Open one again and you get everything that happened while you were away, then live text. END SESSION in the session menu is the only thing that stops one, and even then it stays resumable. Up to three run at once, and one that sits idle for two hours is ended (resumable later).
Usage. START opens a usage screen: tokens, cache and an estimated cost for this session, the plan limits Claude Code itself reports, and totals for the last 5 hours, today and this week, by model. The totals come from the transcripts on my own machine, and the costs are estimates at API list prices.
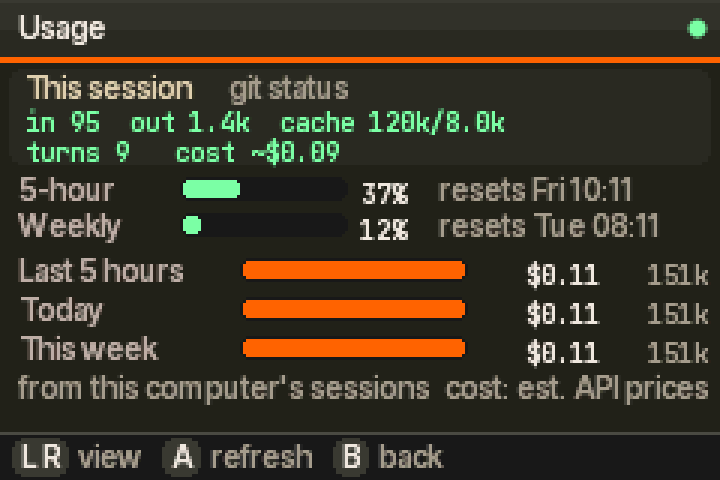 App screen (demo data): the usage page.
Saved chats. On the GBA, conversations are saved to the cartridge (four slots) at the end of each turn, so you can reread them later without the cable.
How it fits together
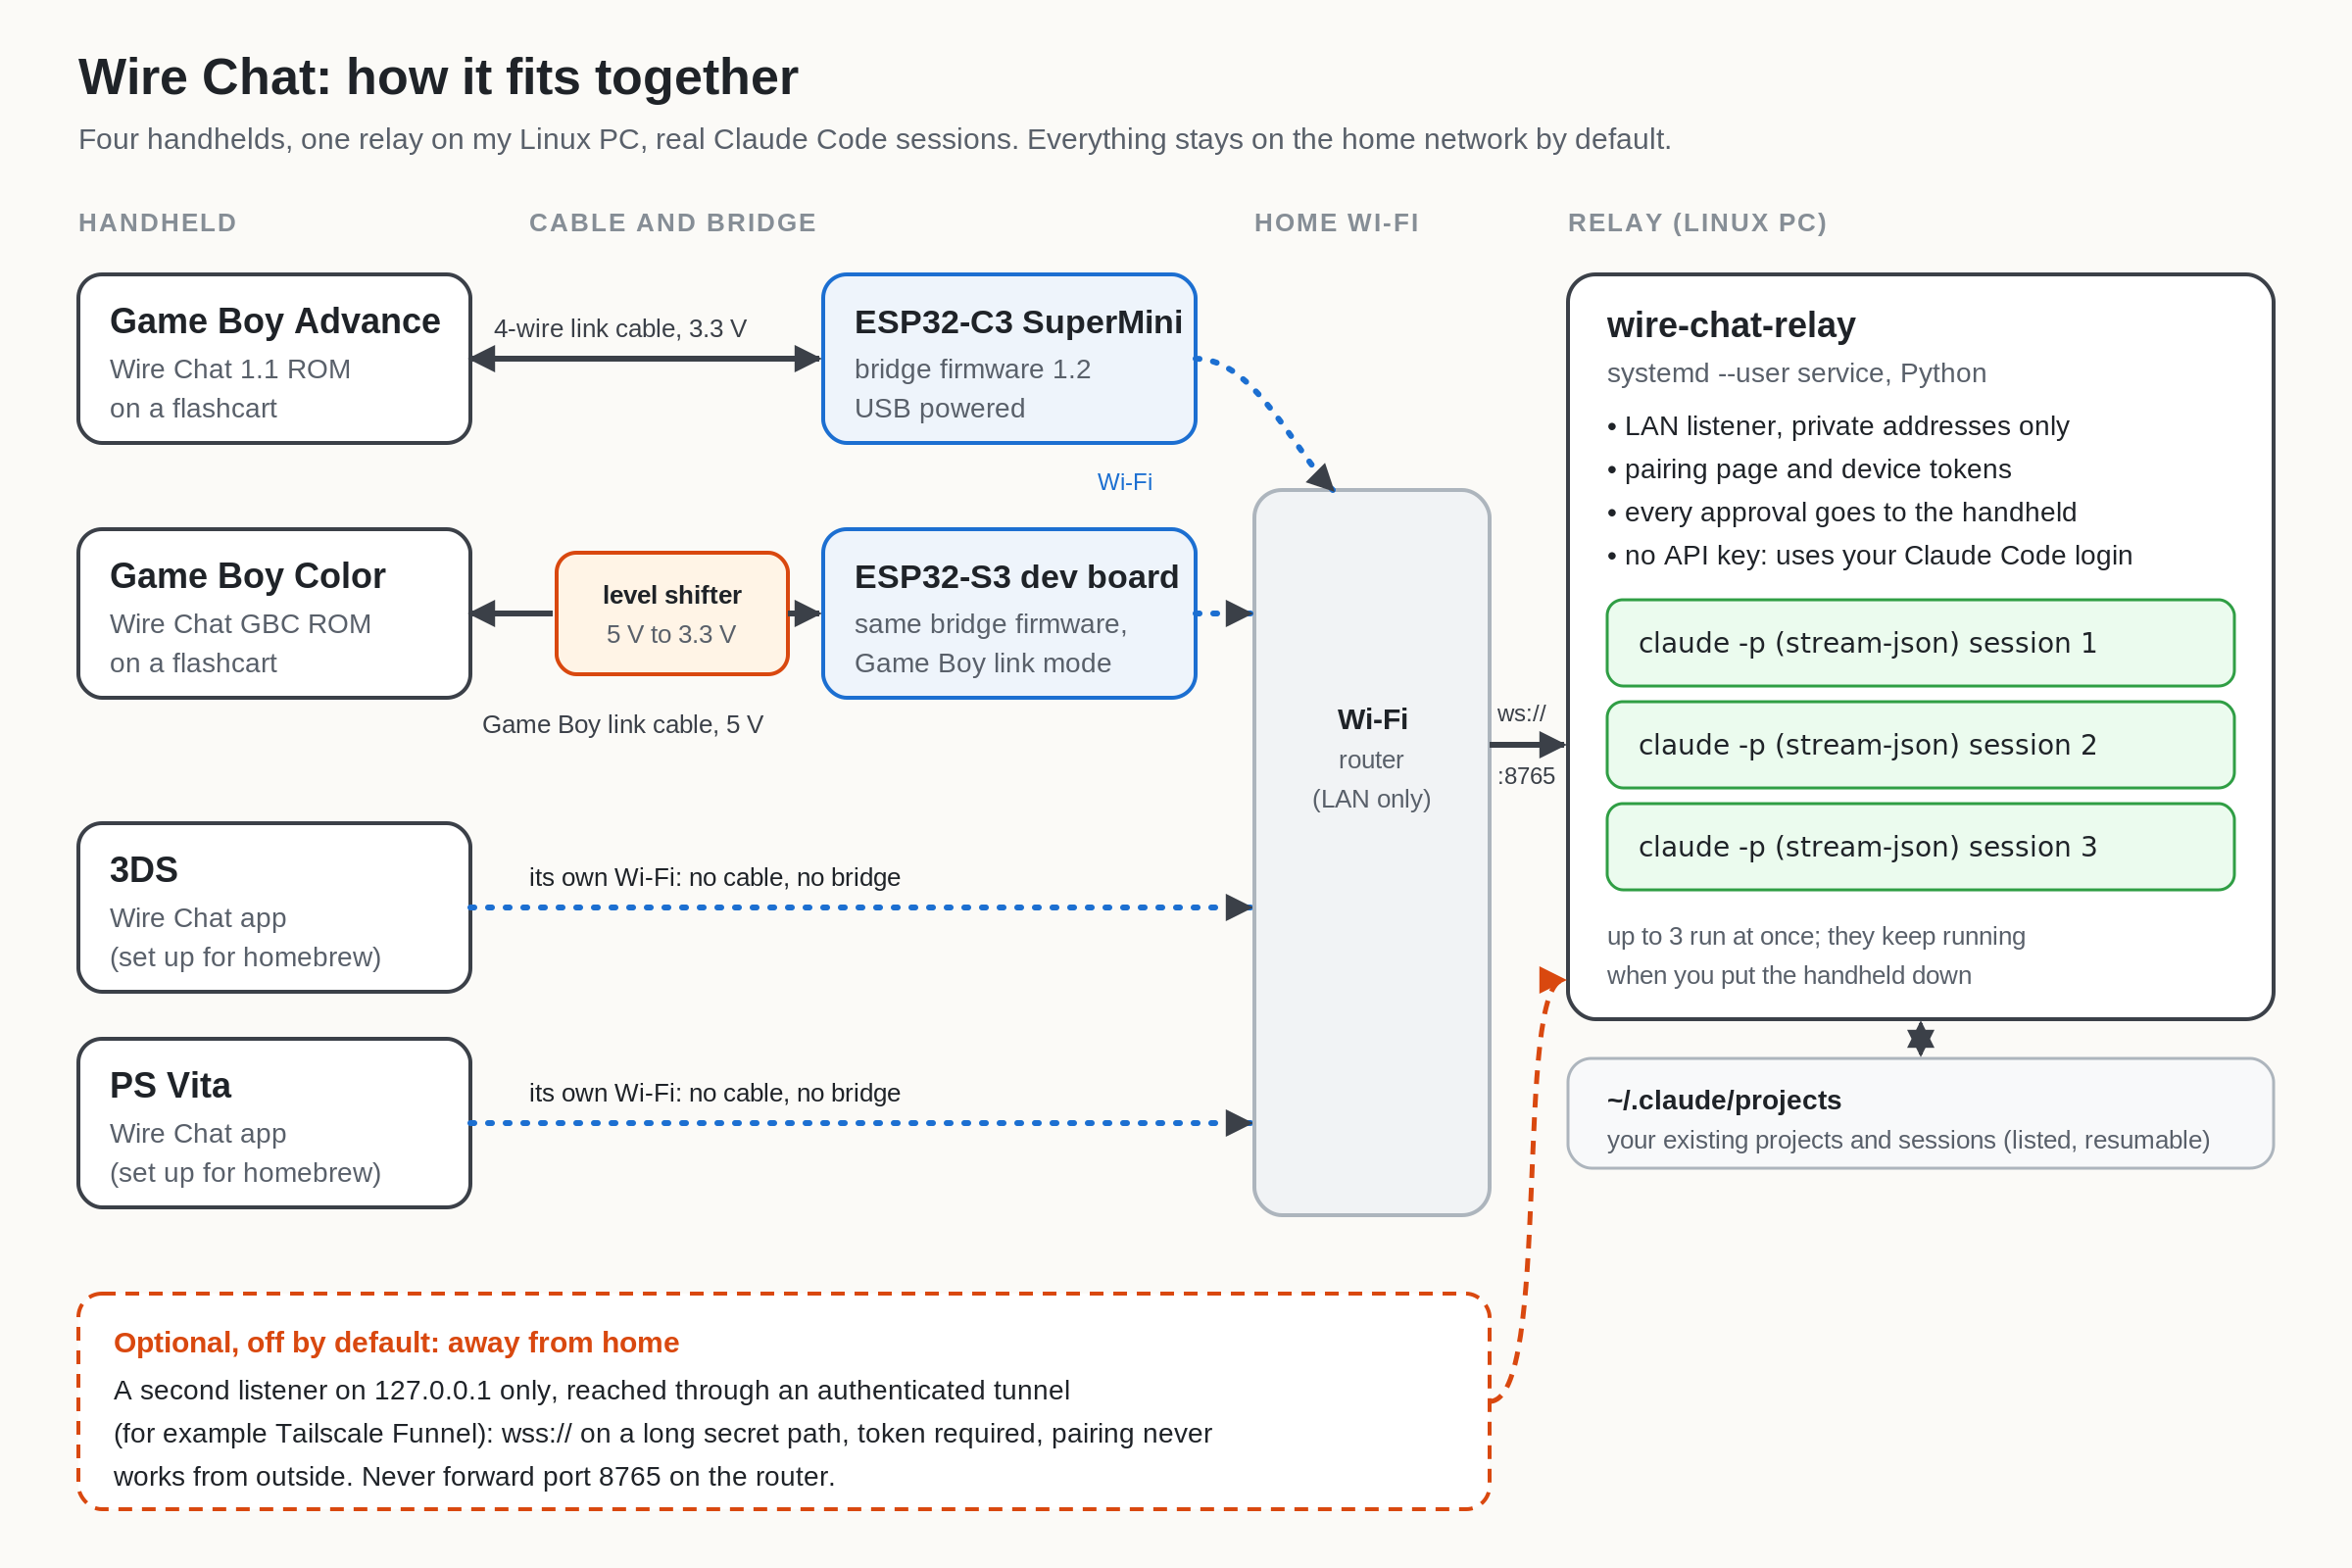
There are three pieces:
- The handheld app. A GBA or GBC ROM on a flashcart, a 3DS app or a PS Vita app.
- The bridge (Game Boy family only). An ESP32 board wired to the console’s link port. It speaks a small framed serial protocol to the console and a WebSocket to the relay over Wi-Fi. The bridge firmware started life as the link for my modular synth project, and one firmware now does both jobs: the ROM says which service it wants when it says hello.
- The relay. A small Python service on my Linux PC, running as a systemd user service called
wire-chat-relay. It lists projects and sessions from~/.claude/projects, startsclaude -pin stream-json mode in the right project folder (resuming the session if you picked one), streams the output into a per-session log, and routes every permission prompt to the handheld through a tiny MCP permission tool.
The 3DS and the PS Vita don’t need a bridge. They have their own Wi-Fi, so their apps talk the relay’s WebSocket protocol directly.
Here’s what one turn looks like:
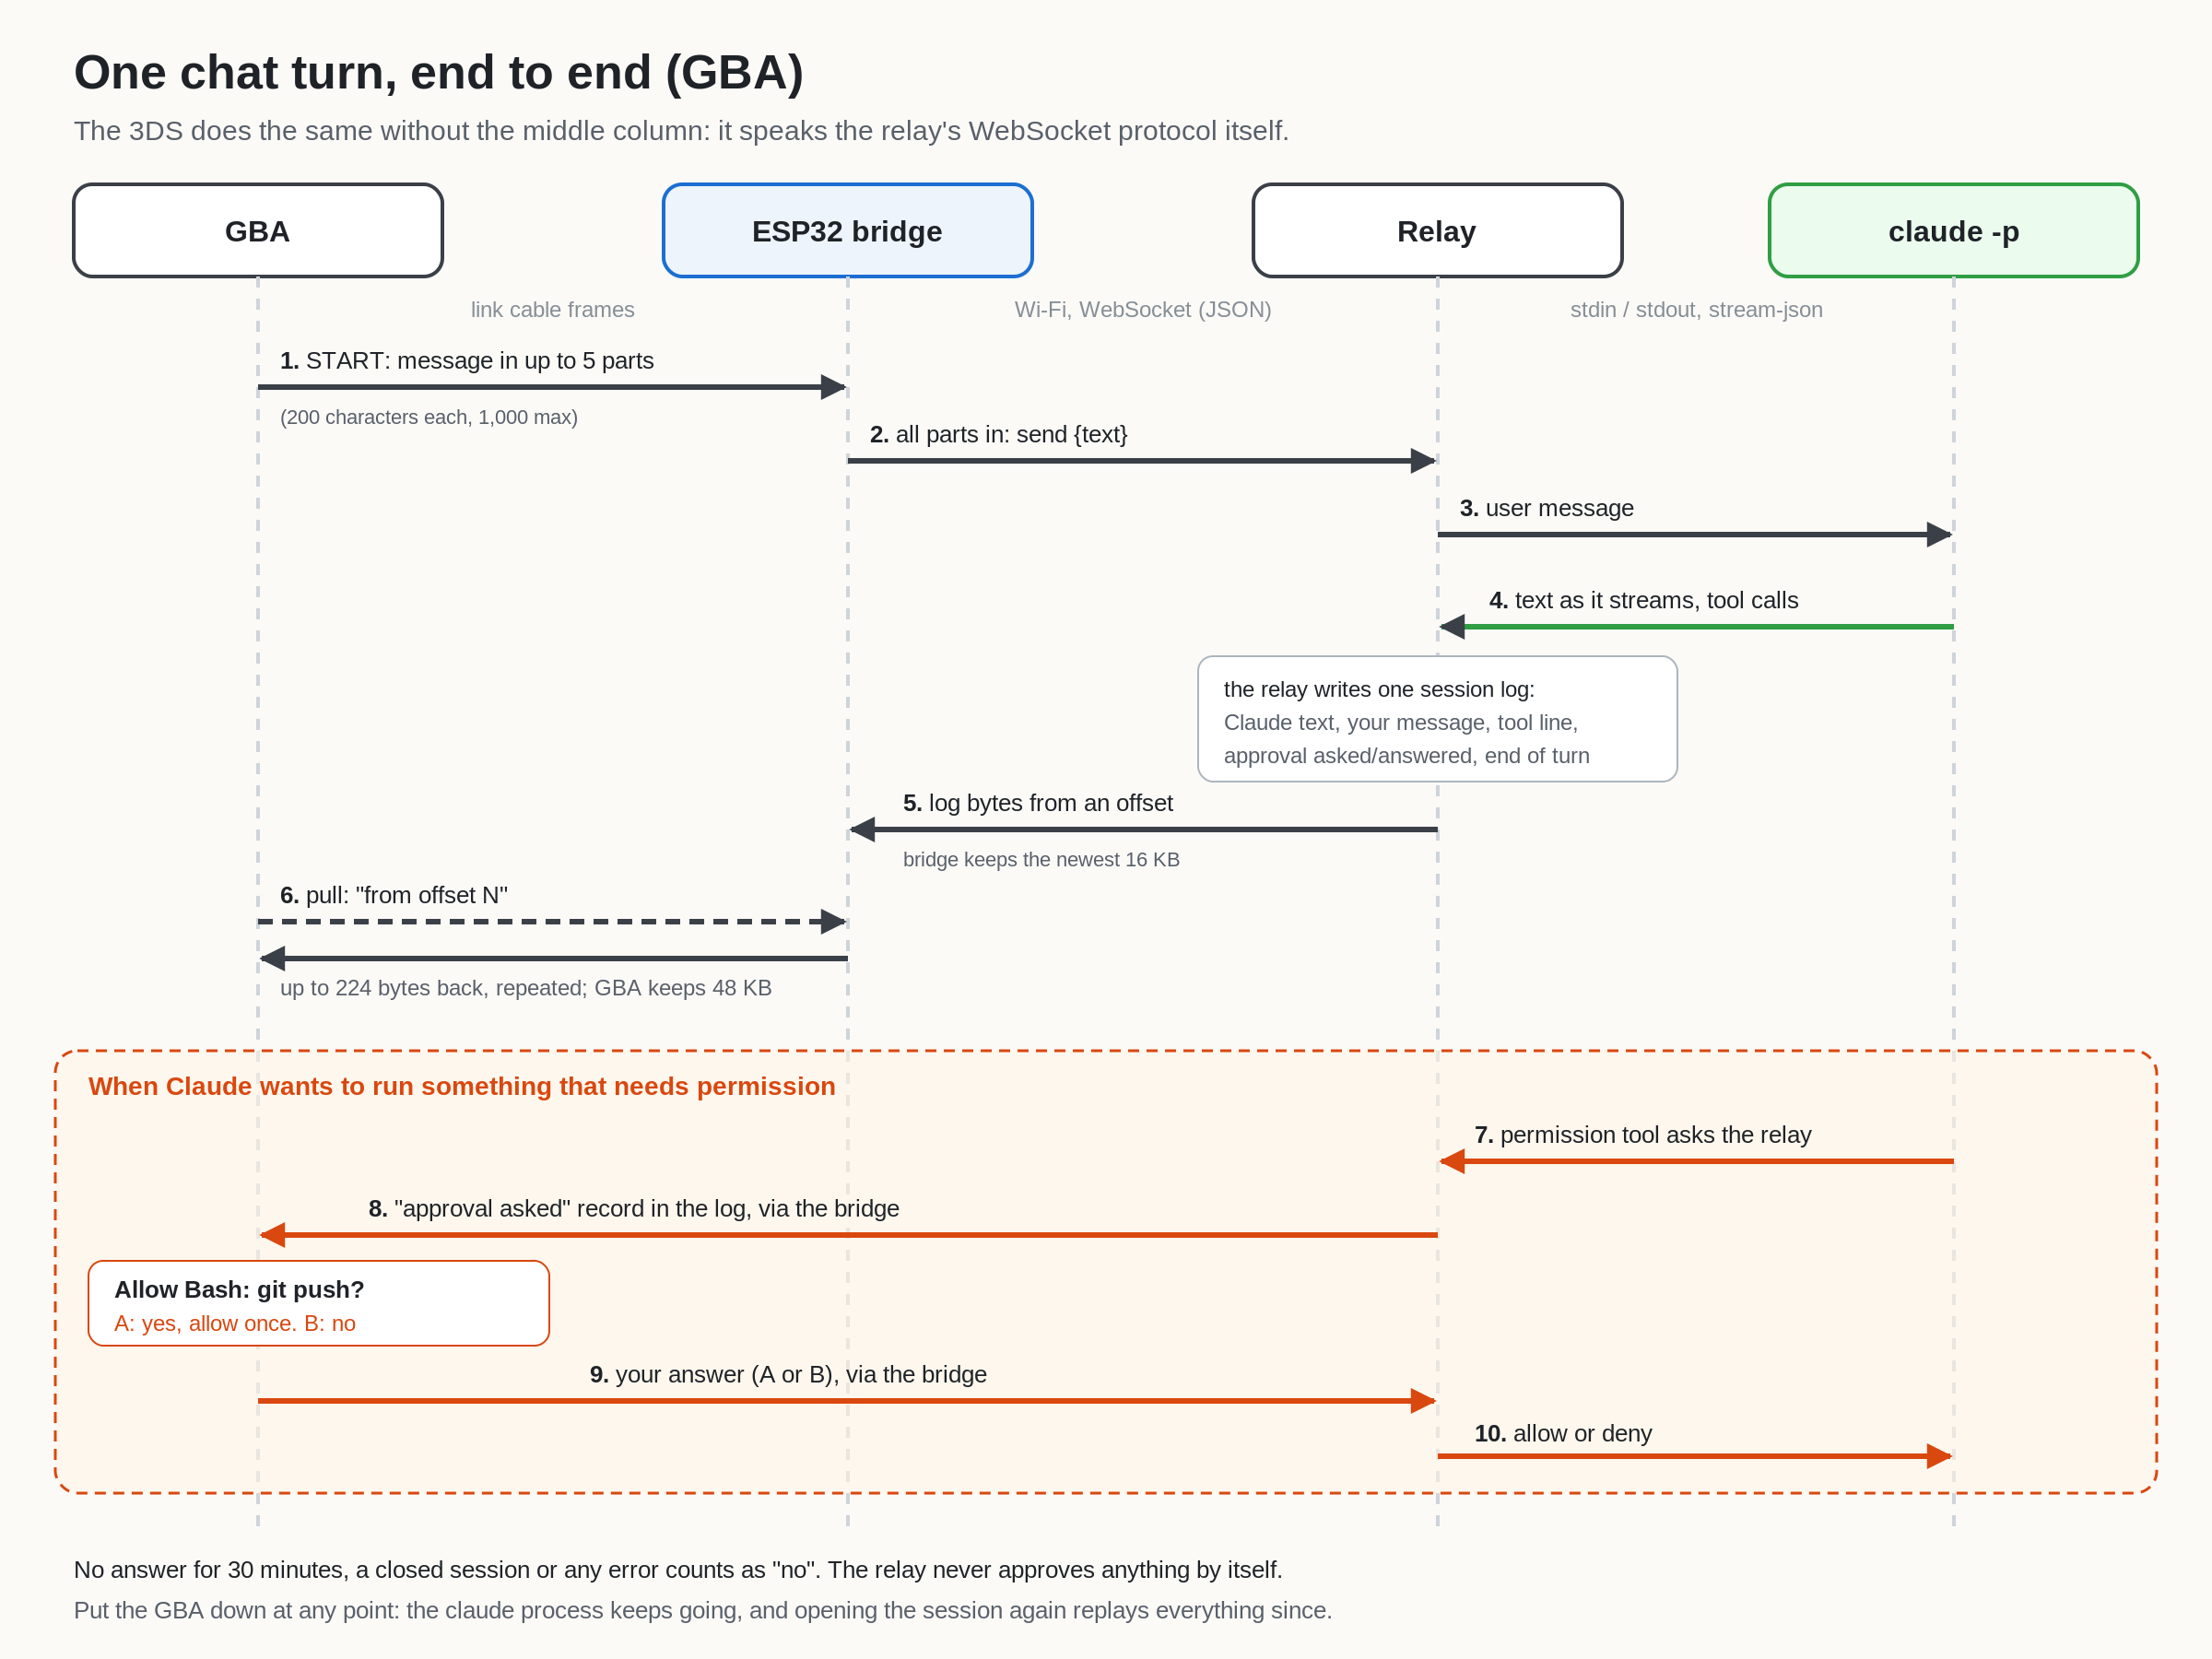
A few design choices worth calling out:
- The relay builds one log per session, a byte stream of small records (Claude’s text, your message, a tool line, “approval asked”, “approval answered”, end of turn). The bridge keeps the newest 16 KB and the GBA pulls it by offset, so a dropped connection just carries on from where it was.
- Text is plain ASCII on the wire. The relay maps fancy punctuation (quotes, arrows, bullets) to ASCII, because a GBA font doesn’t need to know about Unicode.
- Only your user settings load in sessions the relay starts, so a project’s own allow lists can’t quietly skip the handheld prompt, and handheld sessions get only the relay’s permission tool, not your other MCP servers.
- The relay’s own log never holds your prompts or Claude’s replies, only session ids, folder names and tool names. Transcript text only goes to the paired handheld.
Parts list
Relay (all consoles)
- A Linux PC with Claude Code installed and logged in
- Python 3.8 or later with the
websocketspackage (versions 10 to 13) - systemd user services (or cron, see below)
Game Boy Advance
- A Game Boy Advance or GBA SP
- A GBA flashcart with an SD card
- A standard 4-wire GBA multiplayer link cable you are happy to cut
- An ESP32-C3 SuperMini
- One 1 kΩ resistor
- A USB-C cable and a power bank
- A multimeter, soldering iron and some heat shrink
Game Boy Color
- A Game Boy Color
- A Game Boy / Game Boy Color flashcart with an SD card
- A Game Boy link cable you are happy to cut (or a link port breakout)
- An ESP32-S3 dev board with a separate USB-serial chip (an ESP32-WROOM-32D DevKitC works too, on the same pins)
- A 4-channel bidirectional level shifter board (the common BSS138 kind)
- Jumper wires, a USB cable and a power bank
- A multimeter (you will need it, see the mirrored plug story below)
3DS
- A 3DS set up to run homebrew applications
- Its SD card
- The same Wi-Fi network as the relay
PS Vita
- A PS Vita set up to run homebrew applications
- The same Wi-Fi network as the relay
Wiring the GBA bridge
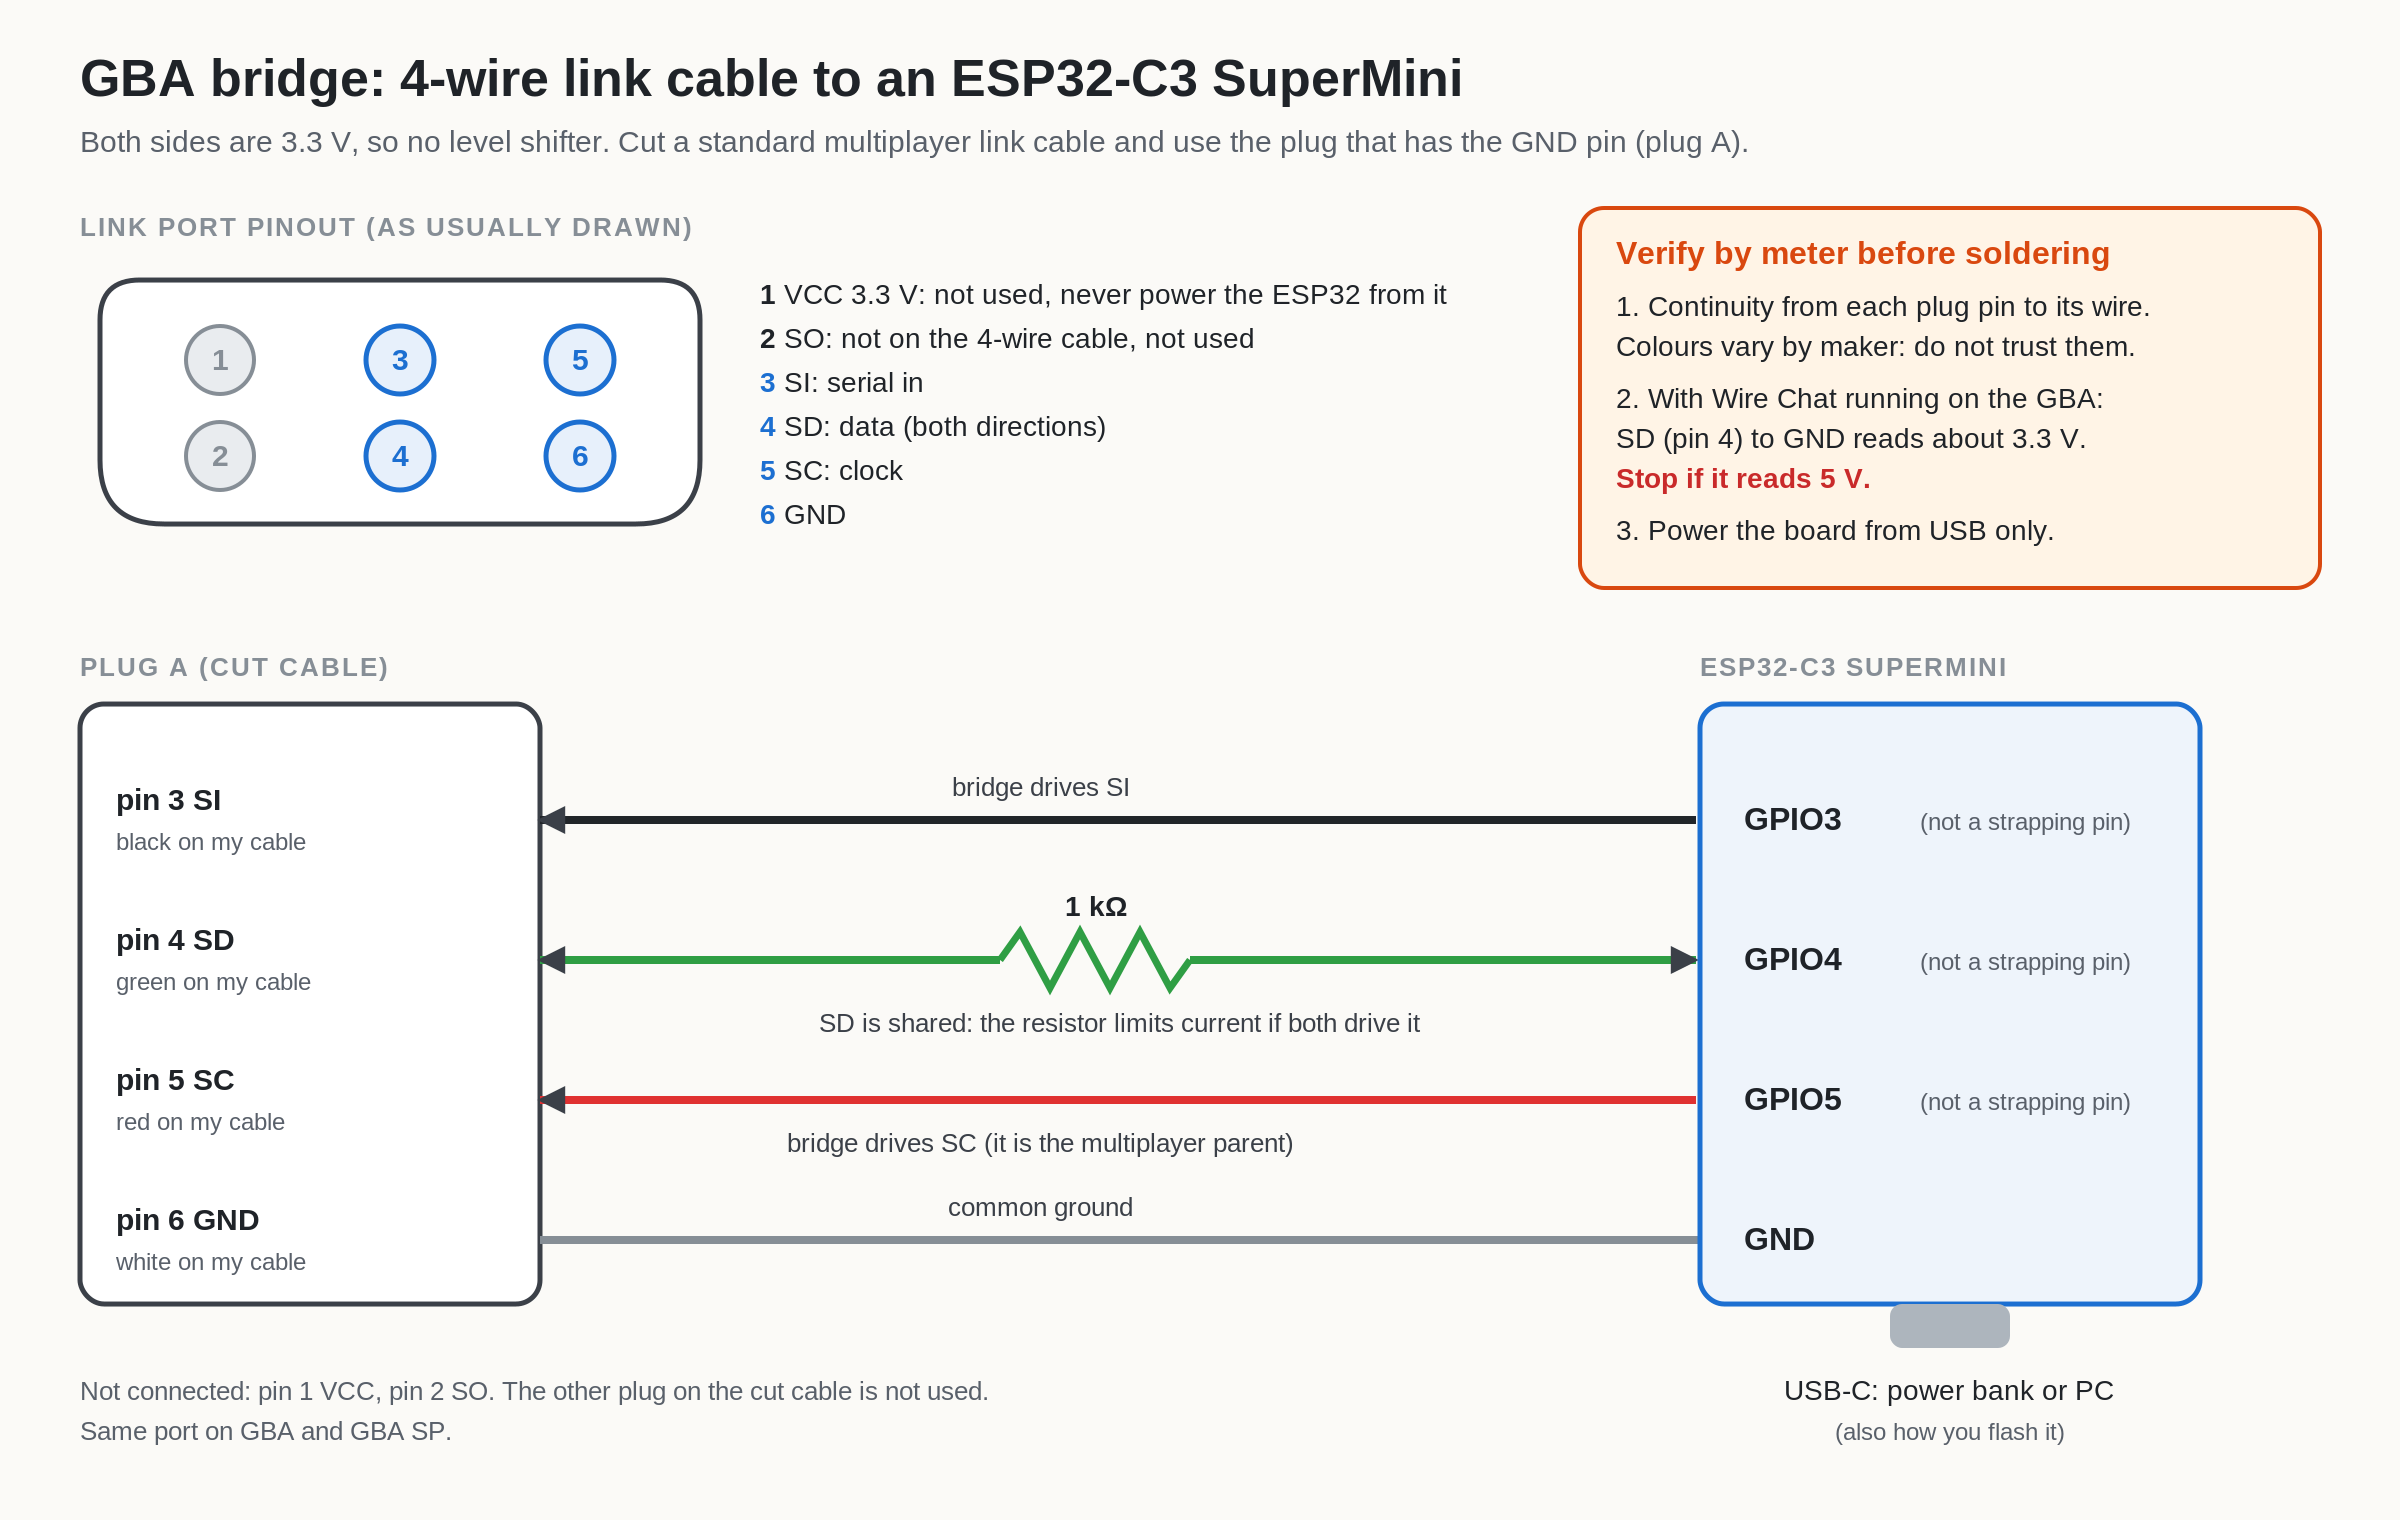
The GBA’s link port is 3.3 V, the same as the ESP32, so no level shifter is needed. The bridge acts as the multiplayer “parent” and the GBA as the first child, which is why a plain 4-wire multiplayer cable works.
-
Pick the right plug. A standard 4-wire multiplayer cable has two different plugs. Use the one that carries the GND pin (I call it plug A). It goes into the GBA. Cut the cable and keep plug A’s end; the other plug is not used.
-
Identify the four wires with a meter. Check continuity from each pin of plug A to its wire end. You want pin 3 (SI), pin 4 (SD), pin 5 (SC) and pin 6 (GND). On my cable they were black, green, red and white, but colours vary by maker, so don’t trust mine.
-
Wire it up:
Link port ESP32-C3 SuperMini pin 3 SI GPIO3 pin 4 SD GPIO4, through a 1 kΩ resistor pin 5 SC GPIO5 pin 6 GND GND Pin 1 (VCC) and pin 2 (SO) are not connected. The bridge drives SI and SC, and drives SD only while it sends its own word; the resistor on SD limits the current if both sides ever drive it at once. GPIO3, 4 and 5 are free on the SuperMini and are not strapping pins.
-
Check the voltage before you trust it. With Wire Chat running on the GBA, SD (pin 4) to GND should read about 3.3 V. If it reads 5 V, stop. That means the port is in Game Boy Color mode, and the C3 isn’t wired for that.
-
Power the ESP32 from USB, a power bank or the PC. Never from the link port.
Wiring the GBC bridge
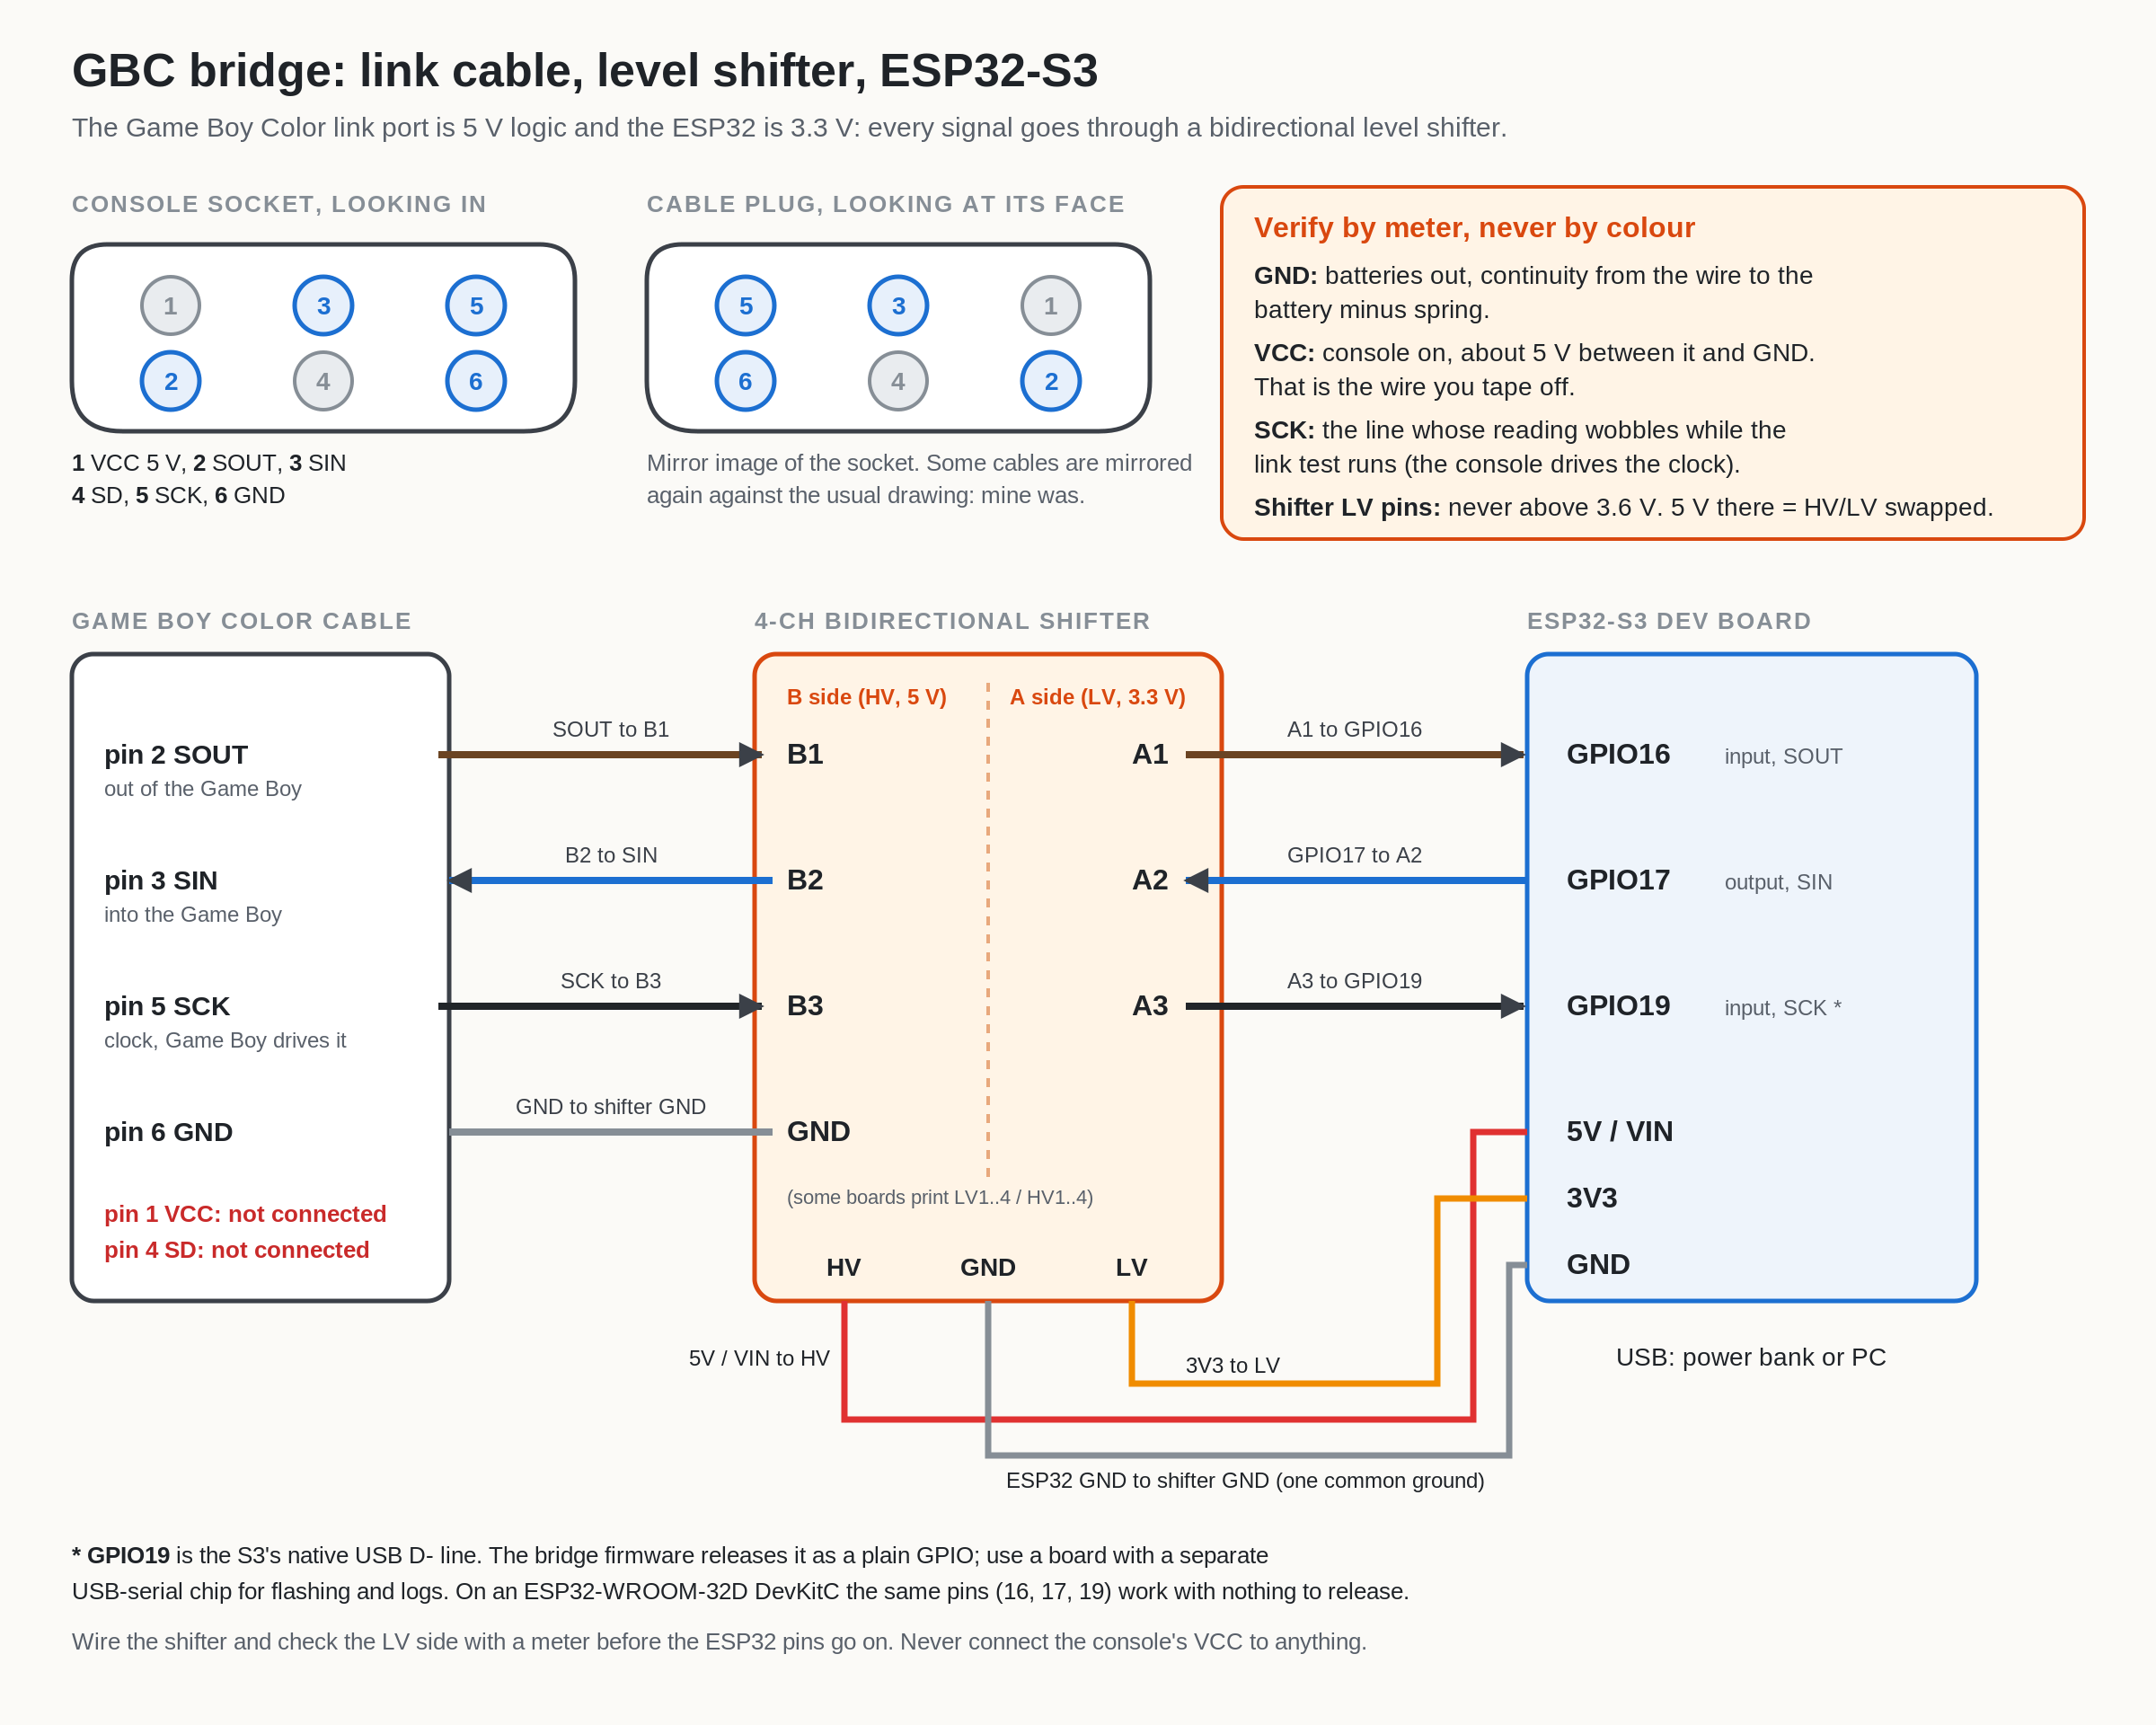
The Game Boy Color is different in two ways. Its link port is 5 V logic, which will hurt a 3.3 V ESP32, and the Game Boy is the clock master: it drives the clock line and the ESP32 acts as a shift register on it. So every signal goes through a level shifter, and nothing on the ESP32 side may drive the clock.
The 4-channel shifter boards I use have an LV side (A1 to A4, 3.3 V) and an HV side (B1 to B4, 5 V). Some boards print them as LV1..4 and HV1..4.
-
Power the shifter first. HV from the ESP32 board’s 5V/VIN pin (the USB 5 V), LV from its 3V3 pin. Join the shifter’s GND to the ESP32’s GND.
-
Identify the cable’s wires by meter, not by colour (more on why in a moment):
- GND: with the batteries out, check continuity from each wire to the battery minus spring.
- VCC: with the console on, find the wire that reads about 5 V against GND. Tape it off. It is never connected.
- SCK: the line whose reading wobbles while a link test runs, because the console is clocking it.
- SOUT and SIN are the remaining two signal wires (pin 2 and pin 3); check them against the pinout from the plug.
-
Wire the signals through the shifter:
Game Boy Color Shifter HV Shifter LV ESP32-S3 pin 2 SOUT (out of the GBC) B1 A1 GPIO16 pin 3 SIN (into the GBC) B2 A2 GPIO17 pin 5 SCK (GBC drives it) B3 A3 GPIO19 pin 6 GND GND GND GND Pin 1 (VCC) and pin 4 (SD) are never connected.
-
Check the LV side with a meter before the ESP32 pins go on. With the shifter powered and the GBC on its connect screen, the LV pins should sit around 3.3 V and never above 3.6 V. If an LV pin shows 5 V, the board is wired HV/LV the wrong way round.
-
Then connect A1, A2 and A3 to GPIO16, 17 and 19.
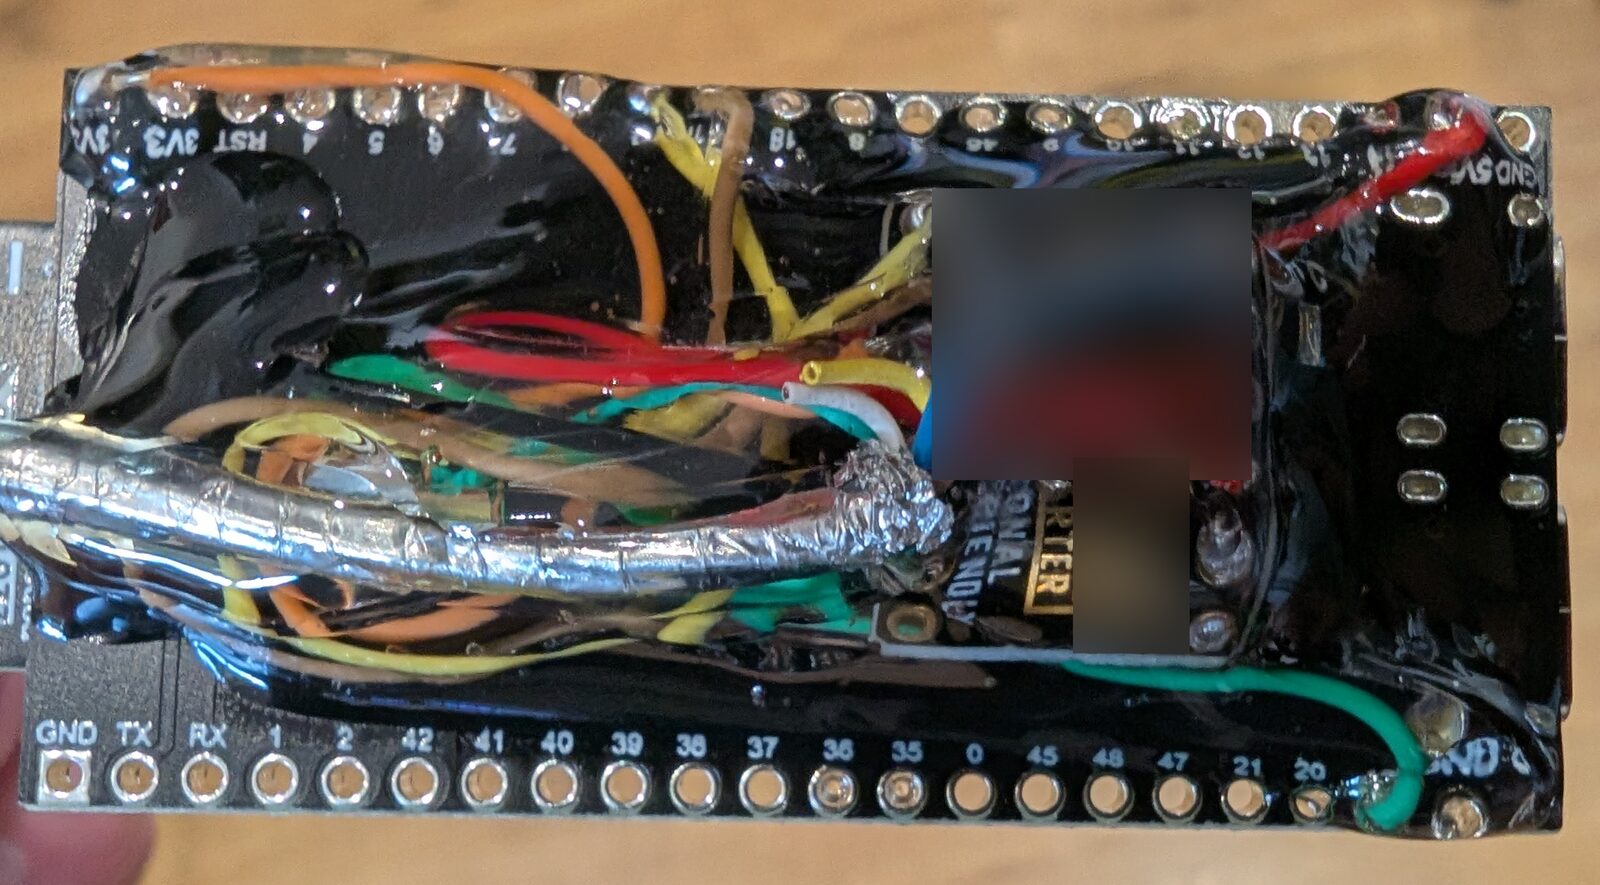 Photo: my GBC bridge. The ESP32-S3 with the level shifter on top and the cut link cable, all sealed under a protective coating. The shifter’s maker print is blurred.
On an ESP32-WROOM-32D DevKitC the pins are the same (16, 17, 19). On the S3 there is a catch with GPIO19, covered in troubleshooting.
Important: set the bridge’s “Link cable” option to Game Boy / Game Boy Color before you plug the console in. In the GBA modes the bridge drives the clock pin, which must never happen against a Game Boy that is also driving it. Builds made for the GBC start in Game Boy mode, but an app-only update keeps whatever mode was saved, so check the bridge page.
Flashing the bridge
The bridge firmware comes as merged images per board: a full image written at 0x0 (fresh boards; it erases Wi-Fi, pairing and settings) and an app-only image written at 0x10000 (updates; it keeps them).
Getting the files: download Wire Chat 1.1 (zip, 4.8 MB): relay, bridge firmware, ROMs and the 3DS and Vita apps. SHA-256: 29e203a277101590ac2959f685e961251ba6aa4ef238cd3b78dcf04e73c0ba17. Firmware source on request.
From the browser. Chrome or Edge on a desktop can flash an ESP32 over Web Serial. Espressif’s browser version of esptool (https://espressif.github.io/esptool-js/) works: connect, pick the board’s port, add the full image at address 0x0, and program. Use a USB cable that carries data, not a charge-only one.
With esptool. Install it with pip install esptool, then:
# ESP32-C3 SuperMini (GBA bridge), fresh board: full image at 0x0
esptool --chip esp32c3 --port /dev/ttyACM0 write-flash 0x0 wire-chat-bridge-esp32c3-full.bin

# later updates: app only at 0x10000, keeps Wi-Fi, pairing and settings
esptool --chip esp32c3 --port /dev/ttyACM0 write-flash 0x10000 wire-chat-bridge-esp32c3-app.bin

# ESP32-S3 (GBC bridge)
esptool --chip esp32s3 --port /dev/ttyUSB0 write-flash 0x0 wire-chat-bridge-esp32s3-full.bin
Older esptool versions spell it esptool.py ... write_flash. On Windows the port is COMx. If it can’t connect, hold BOOT while plugging the board in (or hold BOOT, tap EN/RST, let go of BOOT), and close anything else using the port.
First start. A fresh bridge opens a setup Wi-Fi network (called ucor-advance, a leftover of its origins). Join it from your phone and pick your home network. Firmware 1.2 remembers up to three networks, for example home and a phone hotspot, and joins whichever is in range. Then open the bridge’s page at http://<bridge address>/, find “Wire Chat relay”, enter <your relay address>:8765 and save. It only accepts LAN addresses there.
Setting up the relay
The relay runs as your own user. Nothing needs root, and it uses the Claude Code login you already have: it never reads your credentials file and never needs an API key.
1. Install the files
mkdir -p ~/.local/share/wire-chat-relay ~/.config/systemd/user
cp relay/{gba_claude_relay.py,glwire.py,perm_mcp.py,sessions.py,tools.py,usage.py} ~/.local/share/wire-chat-relay/
cp relay/wire-chat-relay.service ~/.config/systemd/user/
It expects claude in ~/.local/bin (or pass --claude /path/to/claude) and Python’s websockets package.
2. Point it at your LAN address
The unit file runs the relay bound to one LAN address. Edit the ExecStart line so --bind is your PC’s address on the home network:
[Service]
Type=simple
ExecStart=/usr/bin/python3 %h/.local/share/wire-chat-relay/gba_claude_relay.py --bind 192.168.1.x --port 8765
Environment=PATH=%h/.local/bin:/usr/local/bin:/usr/bin:/bin
Restart=on-failure
RestartSec=5
NoNewPrivileges=yes
PrivateTmp=yes
Without --bind it picks the machine’s LAN address itself. Either way it is never 0.0.0.0.
3. Start it, and keep it running when you log out
systemctl --user daemon-reload
systemctl --user enable --now wire-chat-relay
loginctl enable-linger "$USER"
journalctl --user -u wire-chat-relay -f
No systemd user services? A crontab @reboot line running the same command works too.
Useful options: --permission-mode manual|acceptEdits|plan|auto sets the default for new sessions (manual unless you say otherwise; the relay page can also set a default per project), --model picks a model (by default Claude Code’s own setting), and --project-settings loads project settings too, if you really want project allow lists to apply.
To update, copy the six .py files again and run systemctl --user restart wire-chat-relay. A restart ends running sessions, but they come back as resumable.
The security model, in short
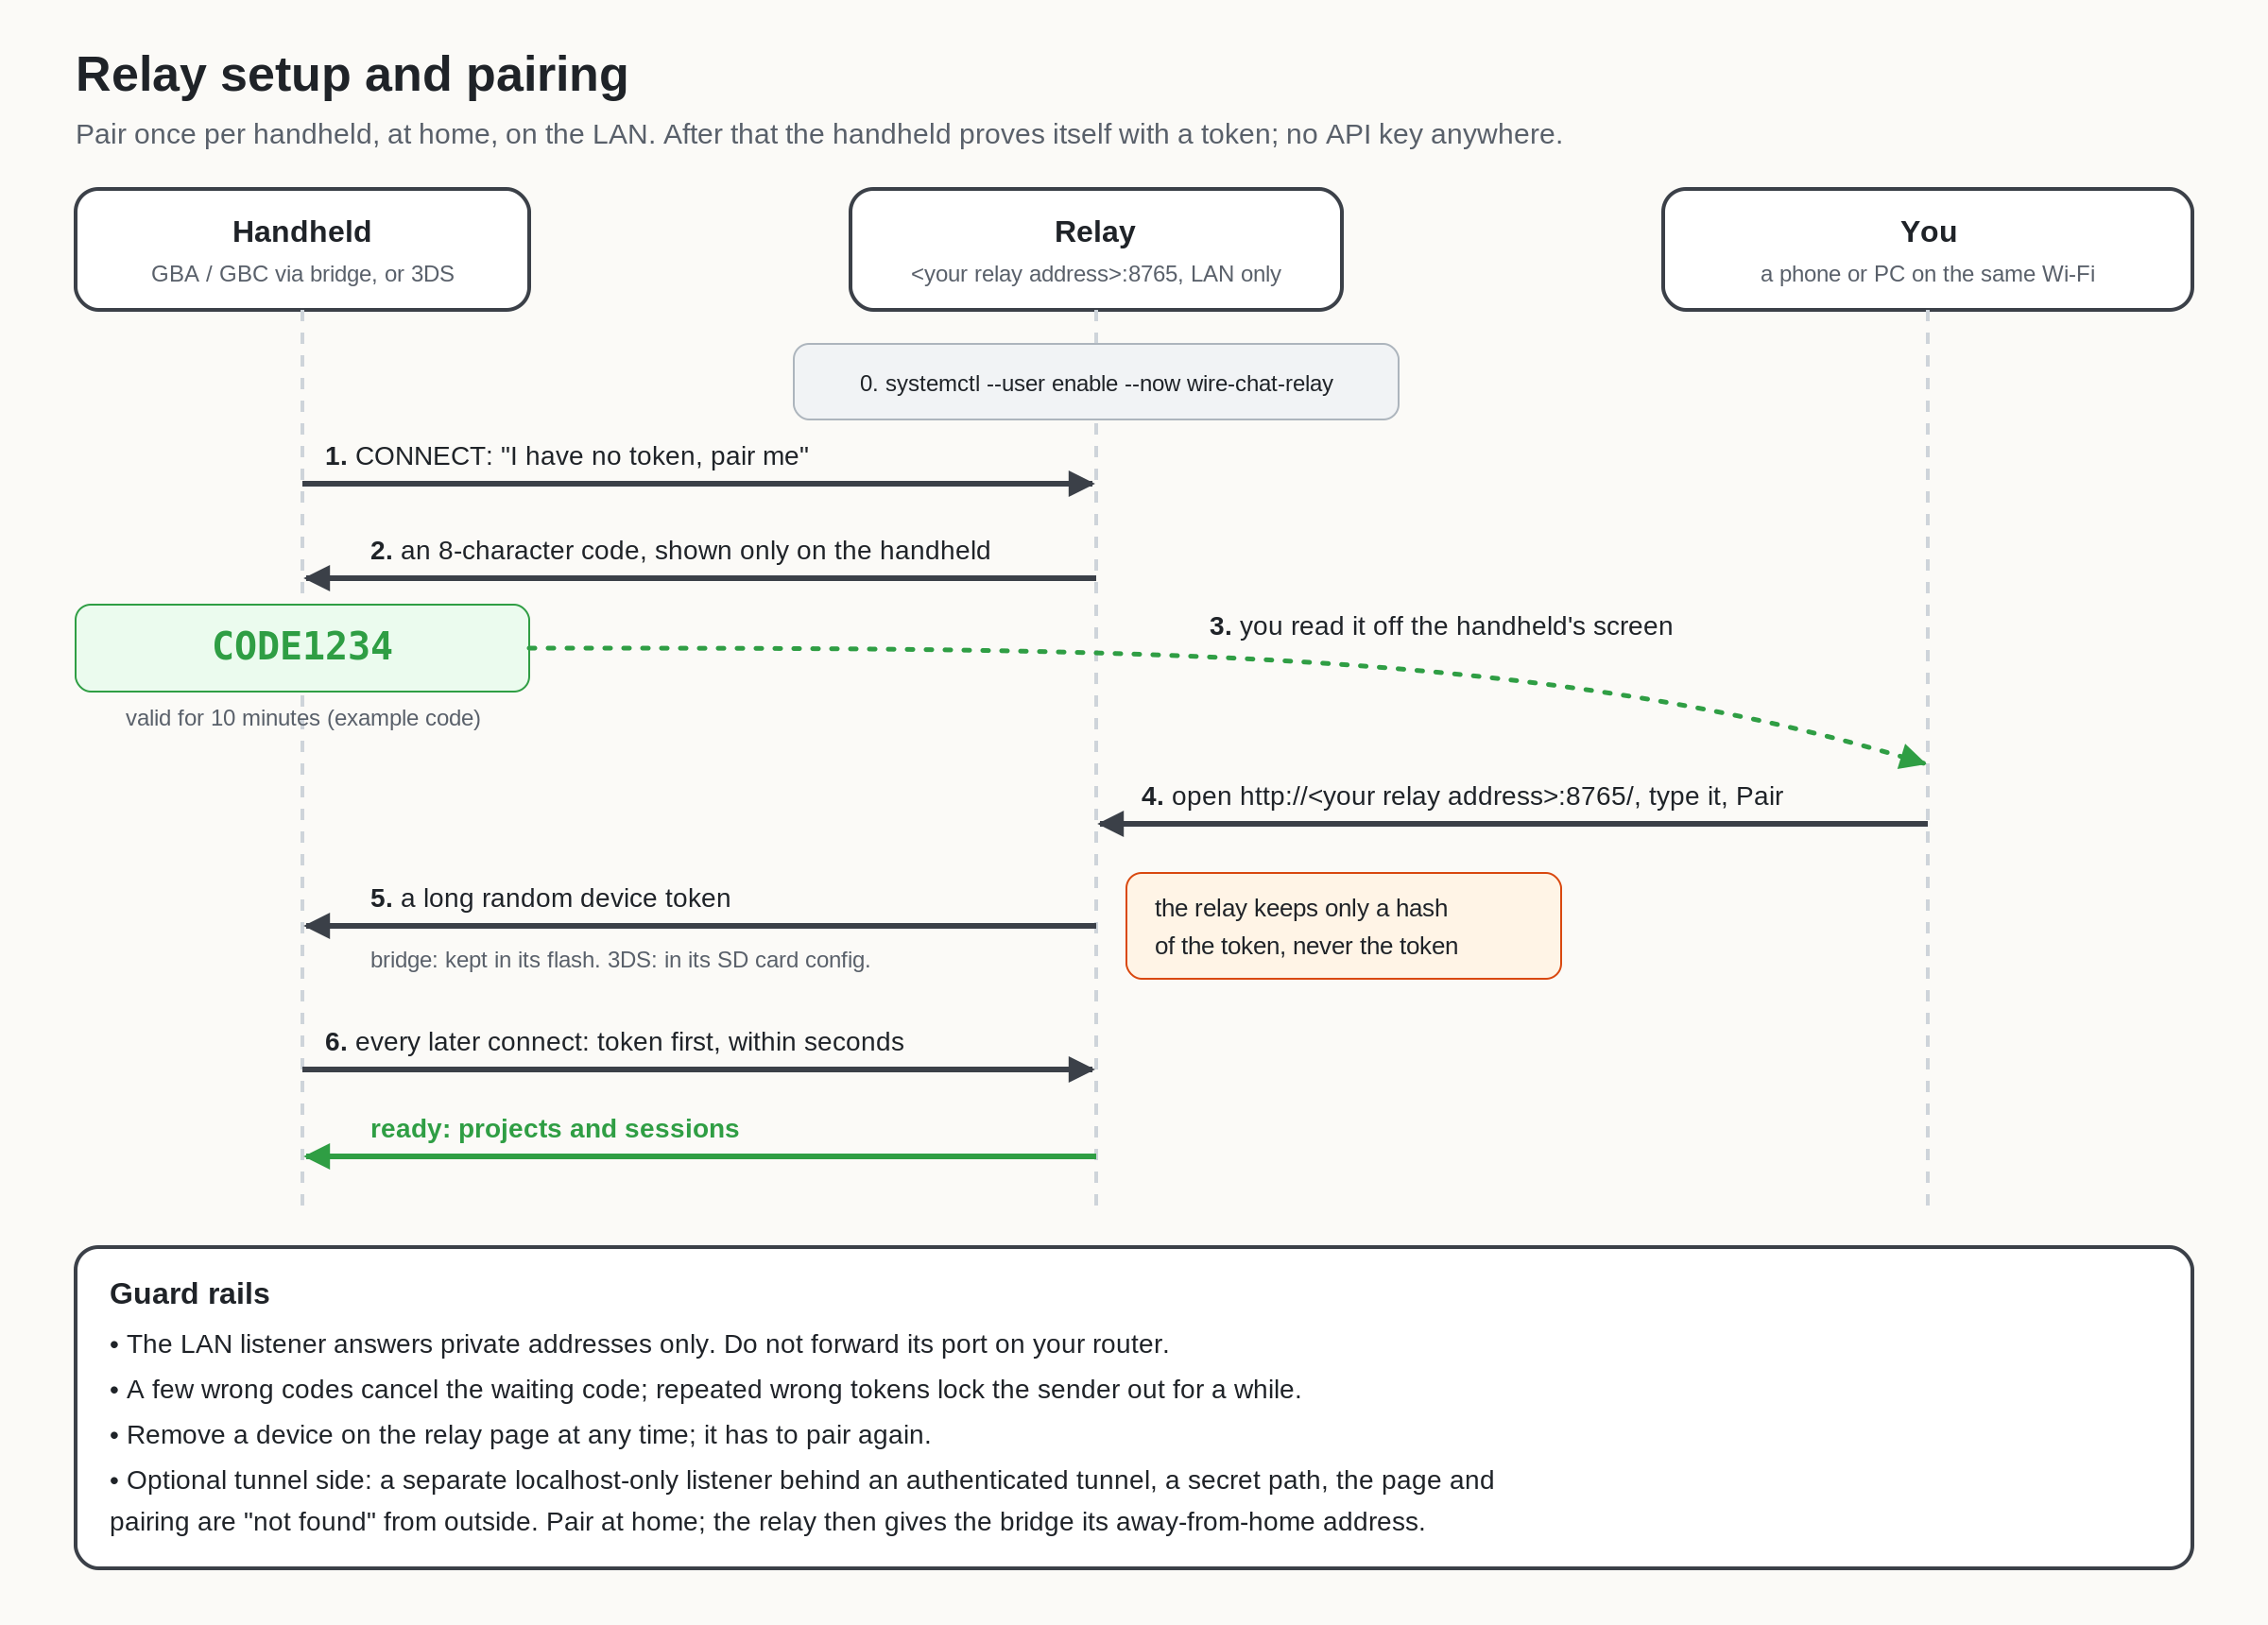
I wanted this to be boring from a security point of view, because the thing on the other end can run commands on my machine.
- LAN only by default. The relay listens on one LAN address and answers private addresses only. Don’t forward its port on your router.
- Pairing codes instead of keys. A new handheld asks for a code. The relay shows an 8-character code only on the handheld; you type it into the relay’s page from a phone or PC on the same Wi-Fi. Codes expire after 10 minutes.
- Tokens, hashed. On pairing, the relay hands the device a long random token and keeps only a hash of it. The bridge keeps the token in its flash; the 3DS and the Vita keep it in a config file on their memory card (treat that file as a secret).
- Rate limits. A few wrong codes cancel the waiting code, and repeated wrong tokens lock the sender out for a while.
- Revocable. Remove a device on the relay page and it has to pair again.
- Approvals never default to yes. Covered above, but it’s the part that matters most.
Optional: away from home through a tunnel
If you really want to use it away from home (say, on a phone hotspot), the relay has an optional second listener for that. It binds to 127.0.0.1 only and is meant to sit behind an authenticated tunnel. The relay supports Tailscale Funnel for this. On that side only the bridge’s wss:// WebSocket answers, on a long secret path; everything else, including the relay page and pairing, returns “not found”. A connection has to present its token within seconds, and wrong tokens get locked out quickly.
You still pair at home on the LAN; the relay then hands the bridge its away-from-home address, and bridge firmware 1.2 tries the LAN address first and the tunnel second.
My advice: keep it LAN-only unless you put it behind a proper authenticated tunnel like that, check from mobile data that the bare address answers “not found”, and turn it off when you don’t need it. Never open the LAN port to the internet directly.
Pairing each handheld
GBA and GBC
- Copy the ROM to the flashcart’s SD card under a new file name for every build (see troubleshooting for why).
- Power the bridge, plug the link cable in, start Wire Chat and pick CONNECT.
- The console shows LINK, WI-FI and RELAY status, then an 8-character code.
- On a phone or PC on the same Wi-Fi, open
http://<your relay address>:8765/, type the code and press Pair. - The projects list appears. Done; from now on CONNECT goes straight there.
“Forget the relay pairing” on the bridge page, or “Pair the relay again” in Wire Chat’s settings, starts over.
Pairing is once per bridge, not per ROM: the same GBC bridge carries my music app and Wire Chat, and the ROM in the slot picks the service when it says hello, so you can swap cartridges freely.
Game Boy Color
Video: Wire Chat on my real Game Boy Color. A session’s reply, then typing “What does” on the keyboard (with the suggestion bar above the keys), sending it, and Claude’s real answer arriving over the link cable. Watch the video (MP4) if it doesn’t play here.
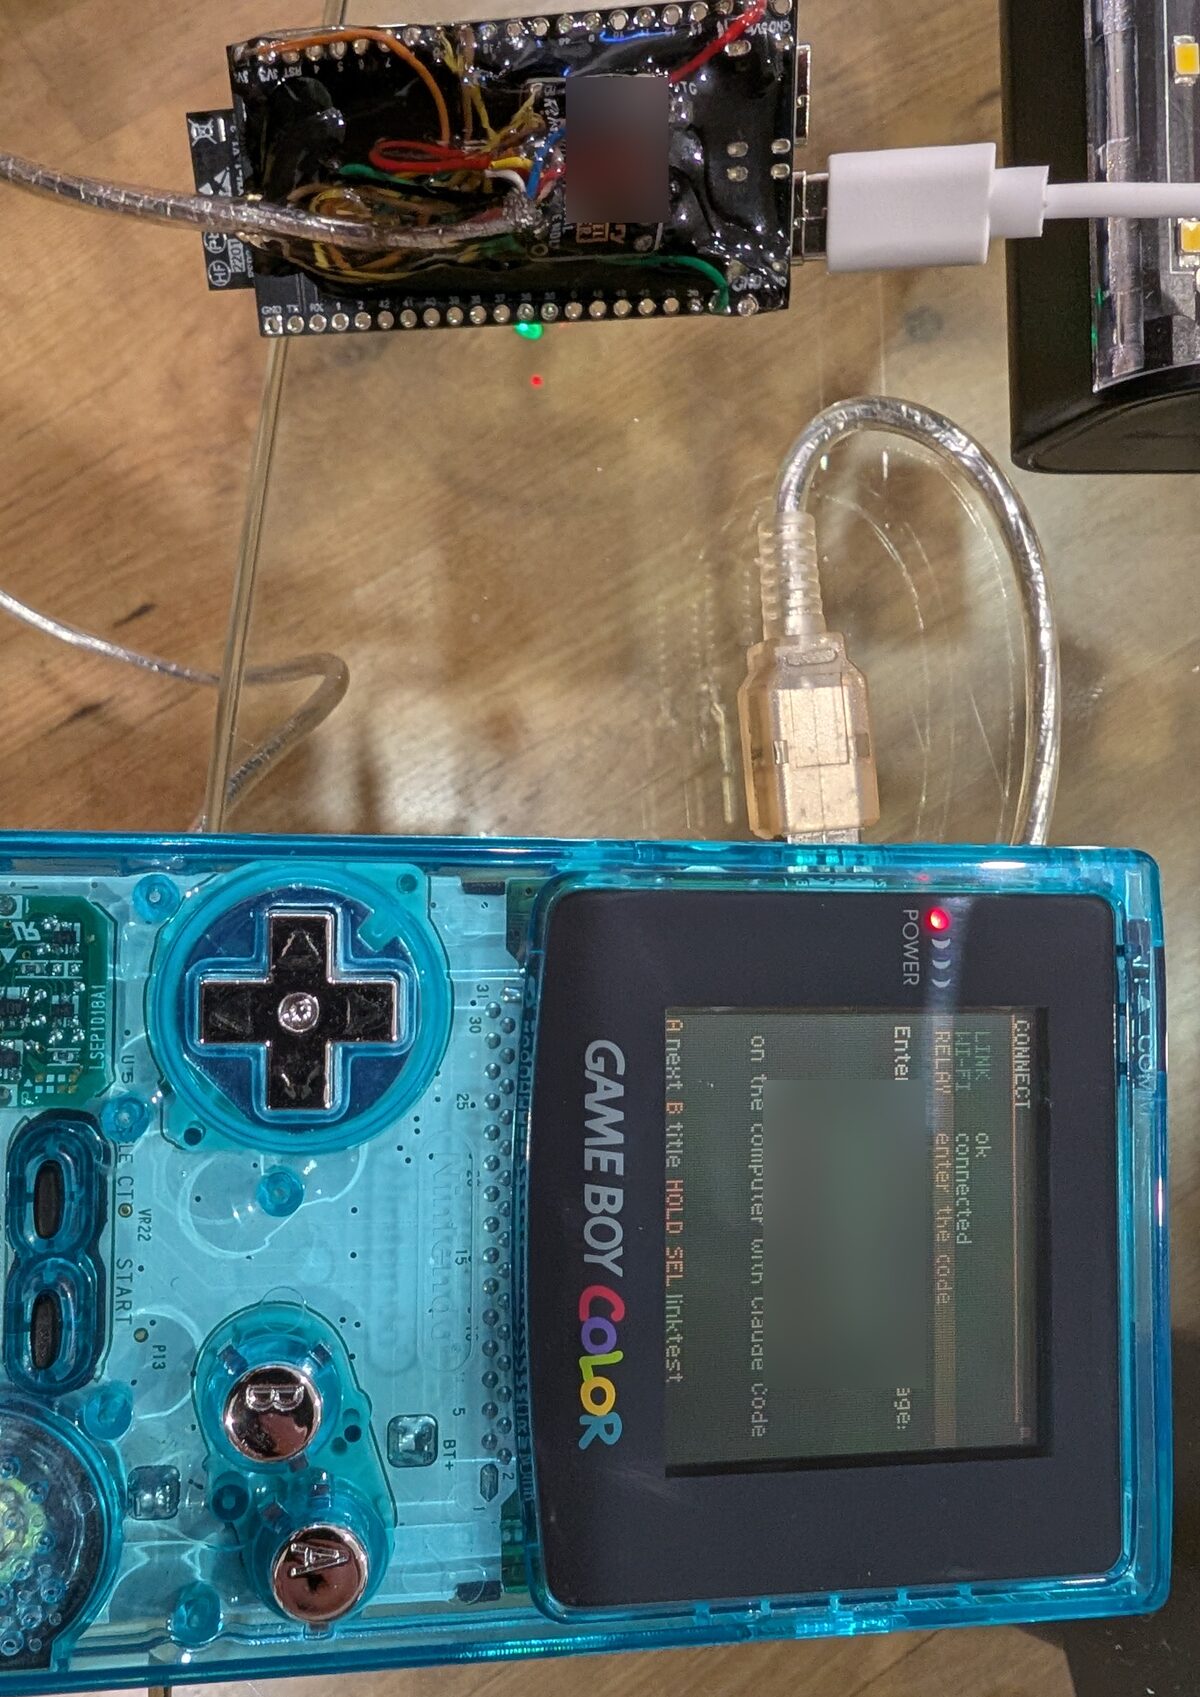 Photo: my GBC on the CONNECT screen with the bridge’s green status light on. Code and relay address blurred.
The GBC version is Game Boy Color only (no original Game Boy build; it needs the Color’s second tile bank). The whole 160 x 144 screen is a bitmap of 18 text rows drawn in its own proportional pixel font, about 30 characters a line and 16 lines of conversation, in the same warm charcoal, cream, green and amber as the other versions.
- The link is slower, so it pages. The Game Boy serial port moves about 2 KB a second, so the ROM is choosy about what it pulls. Opening a session starts near the end of its log, so the first screen appears in about a second however long the session is. While you follow a reply, text scrolls in as it arrives. While you read back, nothing is pulled (a down arrow in the header says there is more), and scrolling to the top pages older text in.
- A keyboard that learns. Draft lines, quick prompts, a suggestion bar, a number row and three key pages. Suggestions come from what you typed before, words learned from the conversation, your project names, developer words and a ranked English list. Learned words are kept in the cartridge’s save RAM, so they survive power off (Settings has “Forget learned words”).
- Pages and keys. There are no shoulder buttons, so LEFT/RIGHT page through lists and the chat, UP/DOWN move a line, A types, B leaves (the session keeps running), START opens usage and SELECT opens the session menu.
- SELECT combos in either order. SELECT + B stops the reply, SELECT + START ends the session (it asks first). On the keyboard, SELECT + A takes the first suggestion, SELECT + B deletes a word and SELECT + START is shift, then caps lock. You can press the two buttons in either order, which is why A, B and START act when you let go.
- Same bridge as the music app. No new firmware: the ROM’s hello tells the bridge which service it wants.
3DS
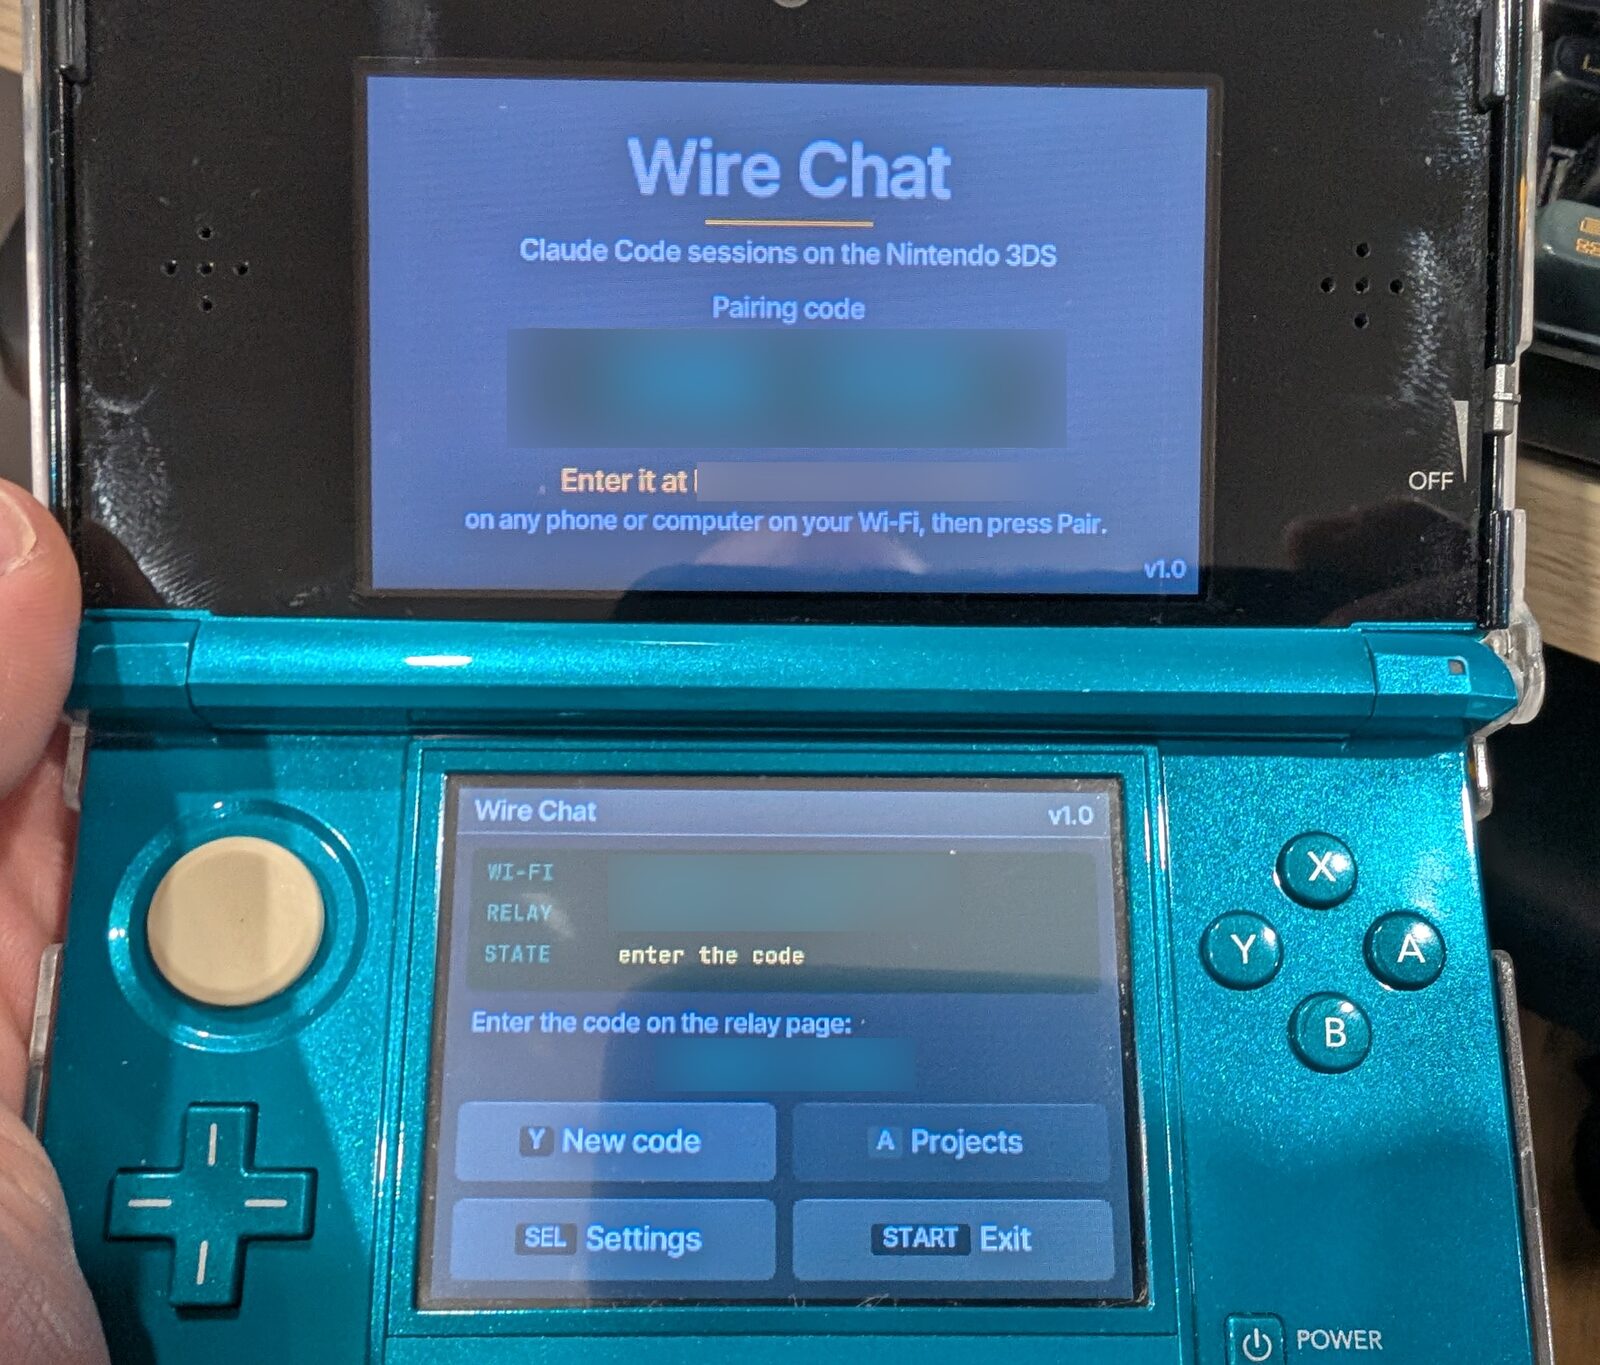 Photo: Wire Chat on my 3DS, waiting for its pairing code to be typed on the relay page. Code and addresses blurred.
- Install the app with your homebrew setup (there’s a
.ciaand a.3dsx; use one of them). - Start Wire Chat, open Settings (SELECT), set “Relay address” to
<your relay address>:8765and save. - It connects and shows the code, big, on the top screen. Type it on the relay page as above. Y asks for a new code.
- The relay lists it as “Wire Chat 3DS”, and removing it there unpairs it.
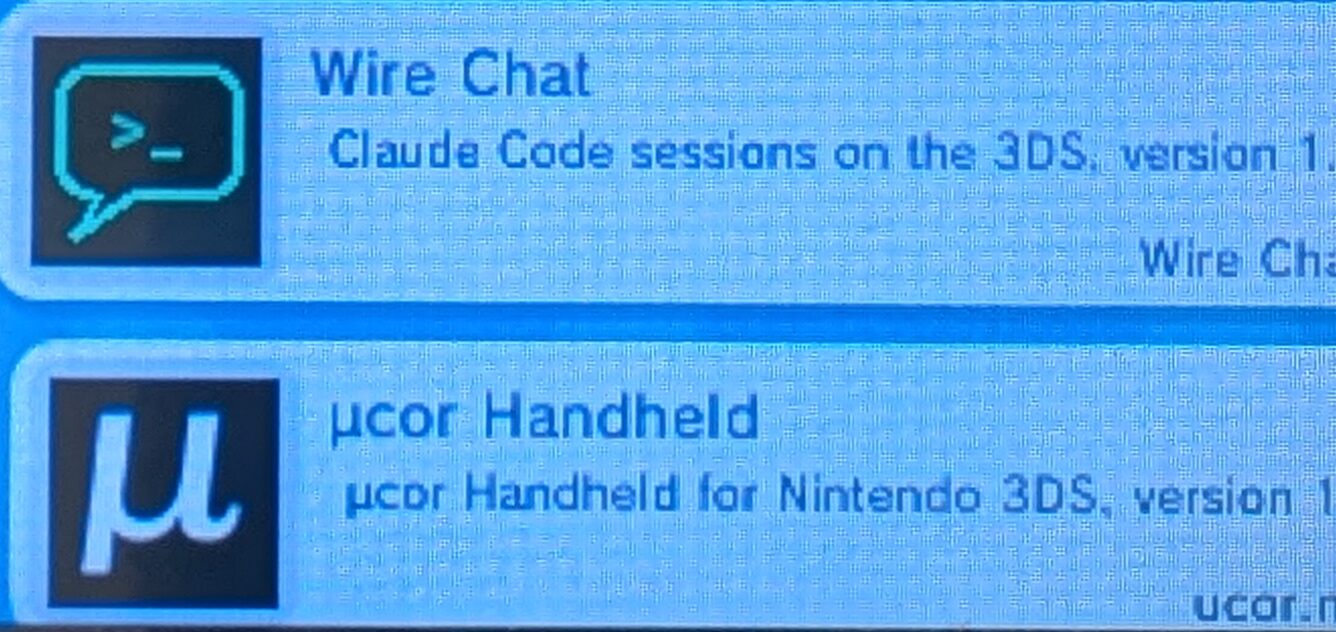 Photo: Wire Chat installed next to my μcor Handheld app on the 3DS. They are separate apps.
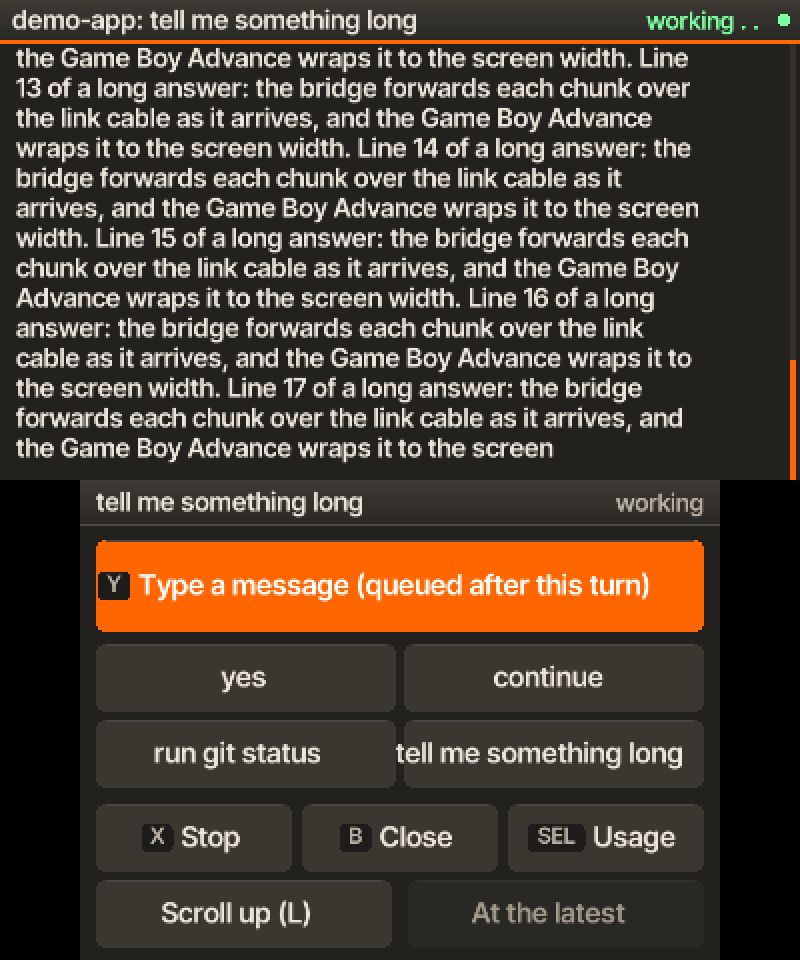 App screen (demo data): the 3DS app, conversation on top, touch controls and quick replies below. The app itself runs on my real 3DS.
On the 3DS the conversation lives on the top screen, colour-coded, and the bottom screen has “Type a message” (the system keyboard, up to 4,000 characters), four quick replies you can edit, Stop, Close and Usage.
PS Vita
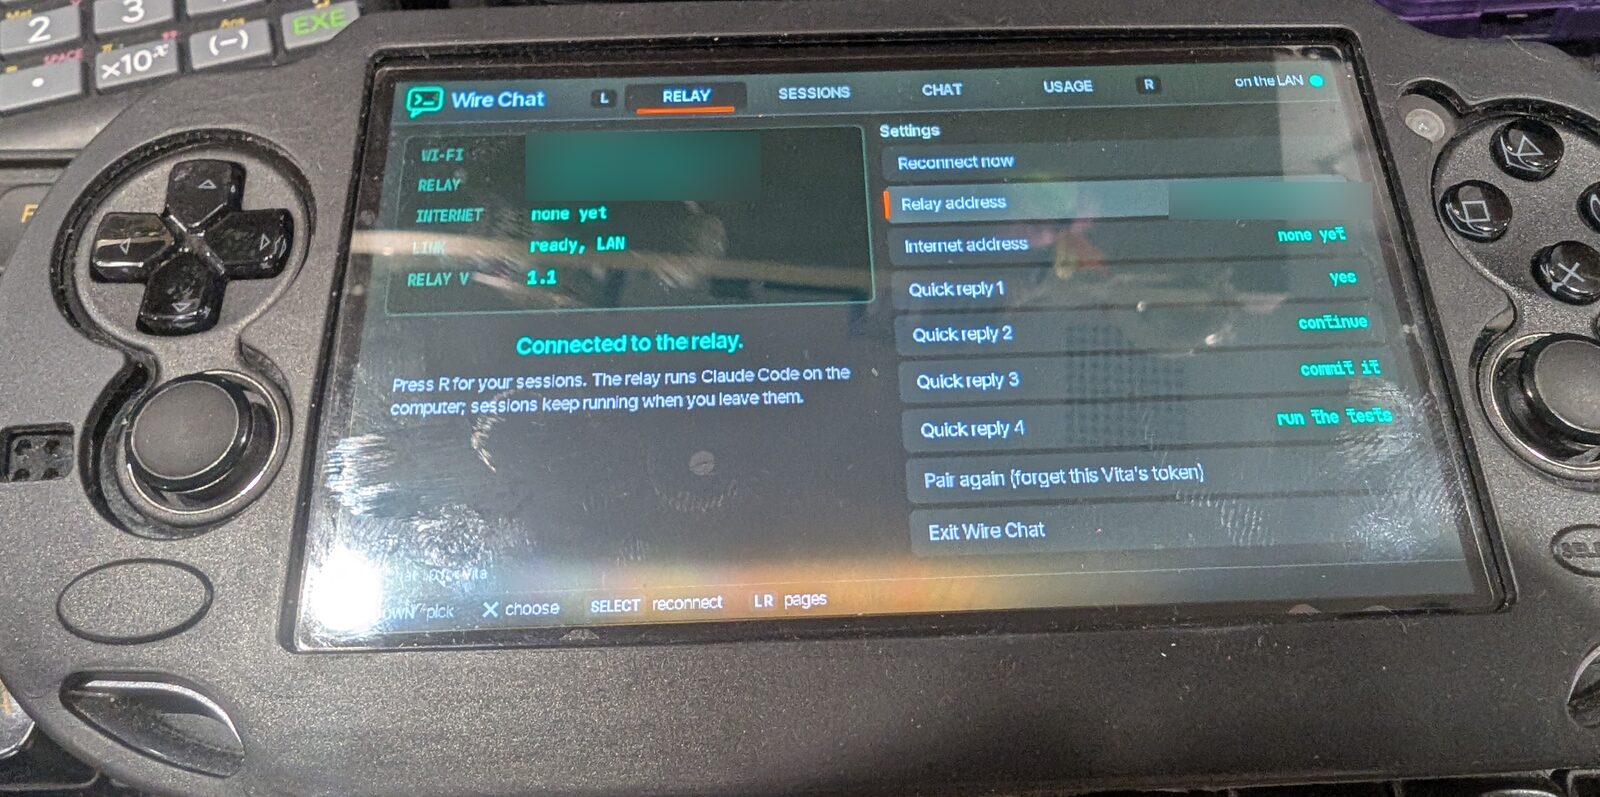 Photo: the RELAY page on my Vita, connected. Addresses blurred.
- Copy the
.vpktoux0:data/on the Vita’s memory card and install it with your homebrew setup. It asks for extended permissions because it keeps its settings inux0:data/wirechat/; allow that. A “Wire Chat” bubble appears on the home screen. - Start Wire Chat. On the RELAY page, set “Relay address” in its settings to
<your relay address>:8765(LAN addresses only). It connects and shows an 8-character code in a green window. CROSS on the first RELAY row asks for a new code. - Type the code on the relay page as above. The Vita says “Paired with the relay” and goes to SESSIONS. The relay lists it as “Wire Chat Vita”, and removing it there unpairs it.
The Vita version uses its one 960 x 544 touch screen as four pages, RELAY, SESSIONS, CHAT and USAGE, and L/R always change the page (or tap the tabs). SESSIONS shows projects on the left and their sessions on the right, with the same RUNNING, ASK ? and read-only markers. In CHAT, code blocks sit in a dark mono panel, and you scroll with either stick, the D-pad or a finger drag that flings. The on-screen touch keyboard has the same word suggestions as the GBA (from the conversation, your projects and a dictionary), numbers and the symbols code needs, up to 4,000 characters. SELECT opens the session menu (permission mode, stop, usage, leave, end session), SELECT + UP and SELECT + DOWN jump to the top and to the latest line, and SELECT + TRIANGLE stops Claude’s reply. An approval appears under the conversation: CROSS or Allow allows it once, CIRCLE or Deny refuses, and a press in the first second after it appears is ignored, so a stray key never answers it.
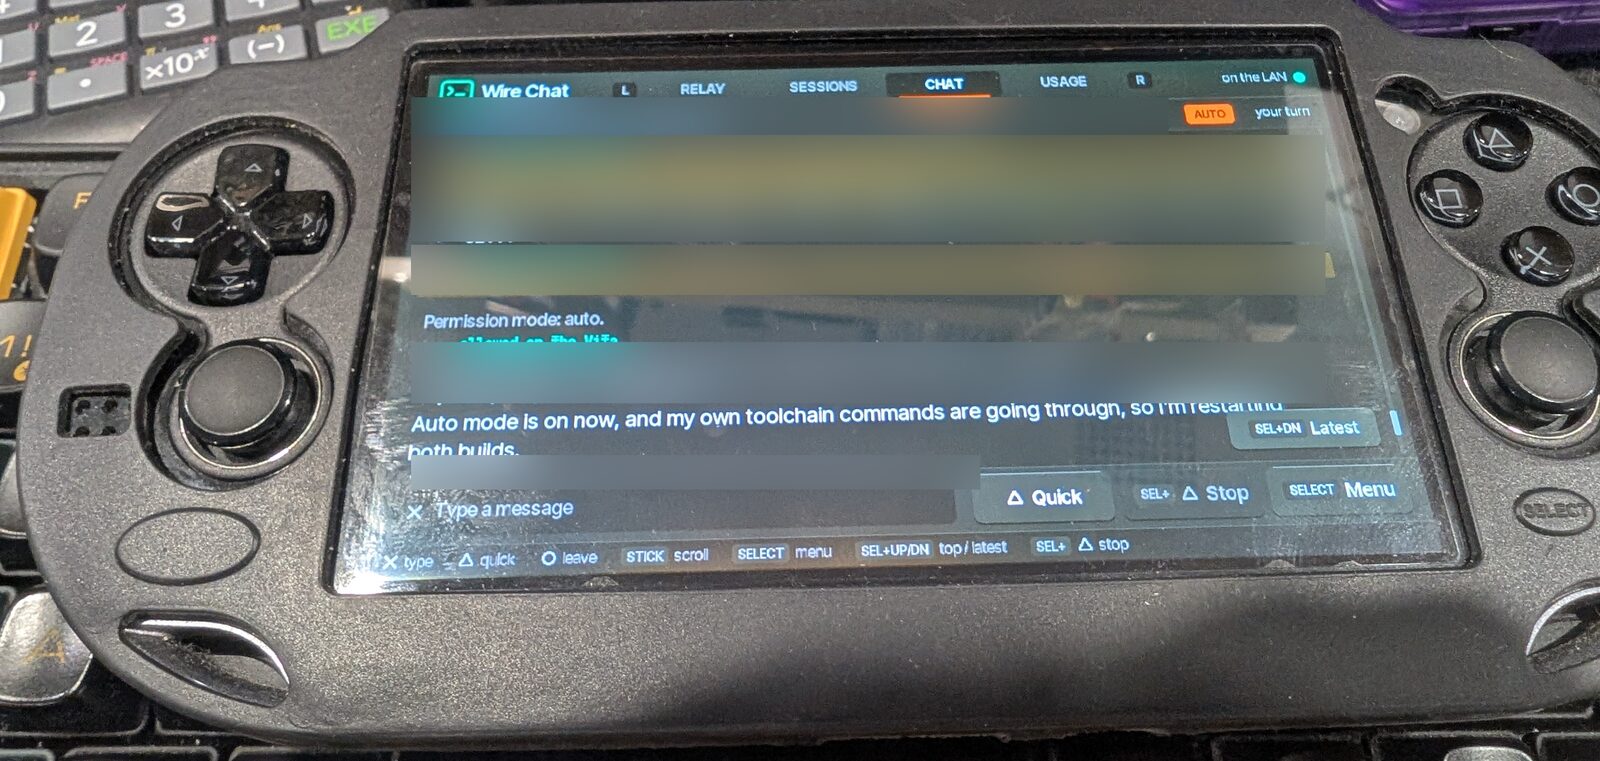 Photo: a real Claude Code session on my Vita in AUTO mode. The blurred lines are tool calls and approvals I answered on the Vita; I blurred them because they show paths and commands from my machine.
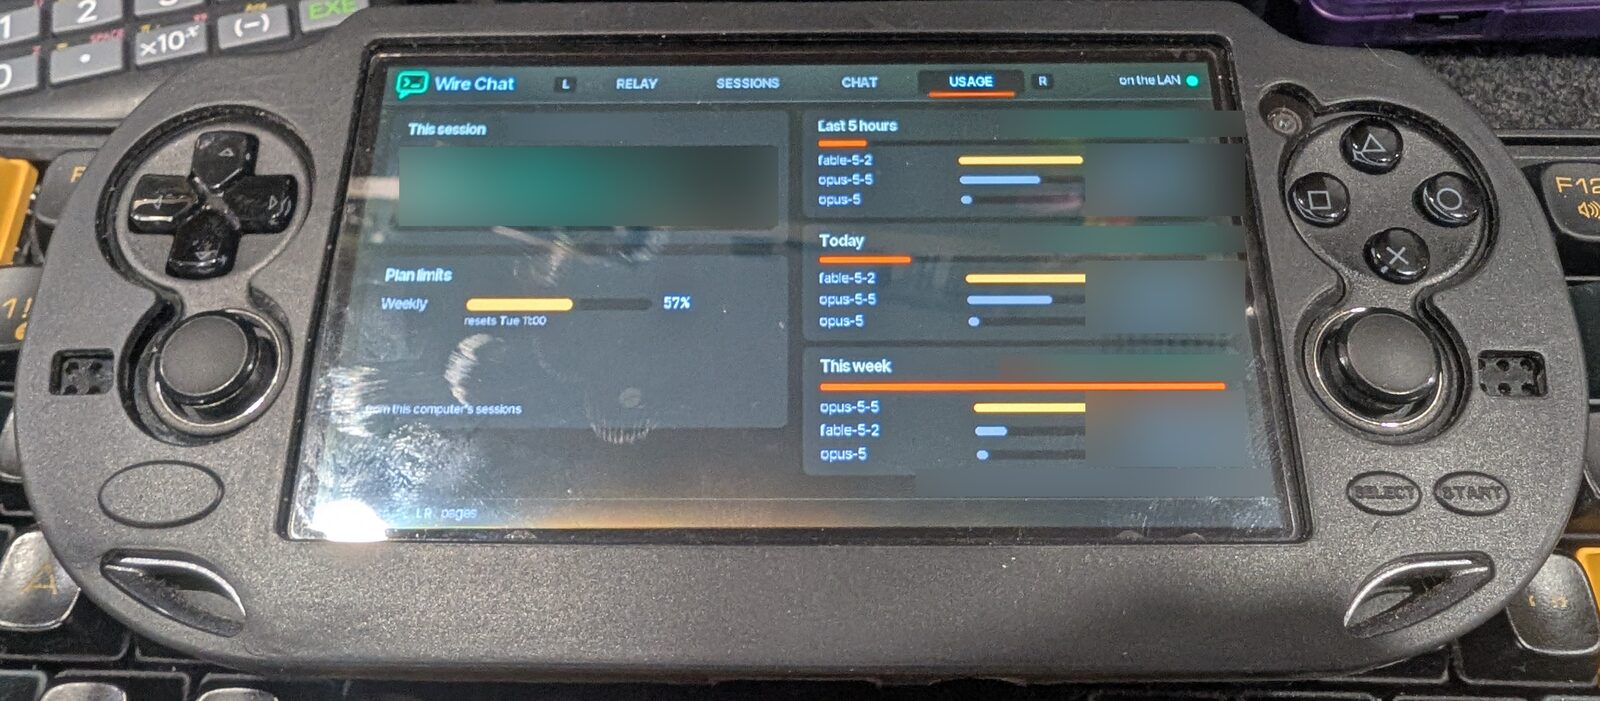 Photo: the USAGE page on my Vita. I blurred the token counts and costs and kept the layout.
GBA controls, for reference
| Where | Keys |
|---|---|
| Lists | UP/DOWN pick, A open, B back, L/R page, SELECT refresh, START usage |
| Conversation | UP/DOWN scroll, L/R page, A type, B leave (Claude keeps working), SELECT menu, SELECT+B stop the reply, START usage |
| Approval | A allow once, B deny |
| Keyboard | D-pad move, A type, B delete (on an empty message: back), L shift (twice: caps lock), R take the first suggestion, SELECT next key page, START send |
One gotcha: while an approval prompt is on screen, B means “no”. If you want to leave the session without answering, use “Leave” in the session menu.
Troubleshooting
“This bridge has no chat service yet.” The bridge is running old firmware without the chat service. Flash 1.1 or later (1.2 for the GBC).
Permission mode changes or END SESSION do nothing from a bridge. Older relay versions dropped those two commands when they came from a real bridge. Update the relay’s files and restart it.
The RELAY line on the connect screen. It tells you where you are: no address set (fill in the bridge page), connecting (wrong address, or the relay isn’t running: check journalctl --user -u wire-chat-relay), pairing needed, code shown, ready, or refused (the device was removed on the relay page; pair again).
“In use by another device.” The relay serves one handheld at a time. If the GBA bridge is connected, the 3DS or the Vita waits; Reconnect on the waiting handheld takes the relay back.
A session opens read only. It’s open in a terminal on the PC right now (or its transcript was written in the last couple of minutes). That’s deliberate: it’s never resumed twice.
A new ROM build shows a black screen. Some flashcarts cache patches per ROM file name. Copy each build under a new file name (I put a short hash in the name), or have the cart regenerate its patches.
GBA: SD reads 5 V. The port is in Game Boy Color mode. Stop, and make sure it’s the GBA Wire Chat ROM that’s running.
GBC: reading the link test. Hold SELECT on the CONNECT screen for half a second. This link test is how I debugged the wiring (first in my GBC music app, which shares the bridge). It shows the serial registers, the clock (8192 Hz at normal speed, 16384 Hz in the GBC’s double-speed mode), bytes sent and received, data bytes (anything other than 00 or FF), frames with a good and a bad CRC, and the last data bytes. The bridge page shows the other side: bytes in and out, the clock it measures, resyncs, and late clock edges. How I read it:
- Only 00 and FF coming back: nothing is answering. A Game Boy reads FF with nothing on the cable. Check the shifter power, the wiring and the bridge’s Link cable setting.
- No measured clock on the bridge page: the clock line isn’t reaching the ESP32. Usually SCK is on the wrong wire (see the next point) or the pin hasn’t been released (see GPIO19).
- Data bytes flowing but bad CRCs climbing: the link works but bytes get mangled. Check grounds and loose jumpers. On a single-core ESP32-C3, Wi-Fi can delay a clock edge (the “late clock edges” counter); that’s one reason I use a dual-core board for the Game Boy.
The mirrored plug lesson. My first GBC wiring did nothing at all. The cable I’d cut had its plug mirrored against the drawing everyone uses, and its colours matched nothing I’d read online: red was GND, black was SCK, brown was SOUT, blue was SIN, white was VCC, and two more wires went nowhere. Going by the usual drawing and the usual colours, I’d wired the wrong pins. The fix was the meter routine in the wiring section: continuity to the battery minus spring for GND (batteries out), 5 V between VCC and GND with the console on, and the clock wire wobbling during a link test. Identify every wire that way and the drawing stops mattering.
The GPIO19 lesson. On the ESP32-S3, GPIO19 and GPIO20 are the native USB data lines. Out of the box the USB peripheral owns them (with a pull-up on D+), so a clock wired to GPIO19 just doesn’t arrive. The GBC bridge firmware explicitly releases those pads back to plain GPIO and turns native USB off, which is why it needs an S3 board with a separate USB-serial chip for flashing and logs. On a WROOM-32D DevKitC, GPIO19 is an ordinary pin and there’s nothing to release.
What’s next
All four handhelds now work on real hardware. What’s left is polish: an original Game Boy version is an open question (the screen design needs the Color’s extra tile bank), and the away-from-home tunnel still needs a proper outing before I’d lean on it.
That’s the whole idea: the GBA, the GBC, the 3DS or the Vita sits on the arm of the couch, and when it asks “Allow Bash: npm test?”, I press A (CROSS on the Vita) and go back to what I was doing.
Share on: